In Depth: Motion Stabilization Options, Part 2 of 2
Sometimes using a tripod is not an option and you’re forced to shoot hand-held. Maybe you’re shooting in an amusement park, botanical gardens, or a concert and tripods are not allowed in. Unless you have the ability to stand perfectly still, you will likely need to stabilize the footage in postproduction. Motion stabilization is used to smooth footage and remove camera shake.
In part 2 of this series, I focus on 4 motion stabilization tools:
- CoreMelt Lock & Load X
- Imagineer mocha
- CHV MotionTracker-collection (FxScript)
- proDad Mercalli Pro
I am a perfectionist who can’t type. After publishing last weeks article, In Depth: Motion Stabilization Options, Part 1, I reworked the article by a new section, General Tips for Stabilizing Footage, I rewrote a portion of the section on Boris Continuum Complete BCC Optical Stabilizer, adding new example videos. I also added several tutorials and resources for the Warp Stabilizer in After Effects and Premiere Pro, as well as BCC Optical Stabilizer. I also spell-checked ![]() Be sure to have a look!
Be sure to have a look!
A special thanks goes out to my sister, Kari, who is letting me use some video that I shot in examples.
CoreMelt Lock and Load X
Toolfarm Price: $199, MSRP: $399 (50% off!). Download a free demo
Hosts Full System Requirements
- Apple Final Cut Pro 6/7 or X
- Apple Motion 4 or 5
- Adobe Premiere Pro CS4 or later
- Adobe After Effects CS3 or later
CoreMelt Lock and Load X is a plug-in that does a pretty good job of stabilizing most footage and compensating for the wobbly distortion of rolling shutter. It works in After Effects, Premiere Pro Final Cut Pro and Motion (Mac only). It’s faster than After Effects Warp Stabilizer but not as fast as proDAD Mercalli PRO, which is featured later in this article.
Here are the basics on how to use Lock and Load X.
- Apply CoreMelt Lock and Load to the footage layer (Effects > C2 Lock and Load > Lock and Load X).
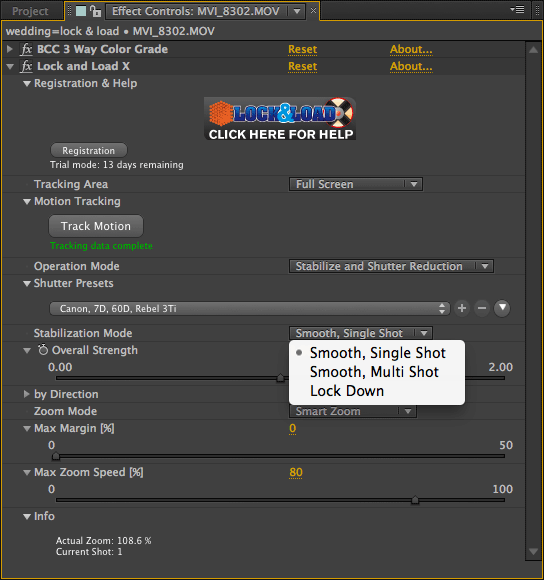
- In the Effect Controls panel under Motion Tracking, there is a pull down menu for Operation Mode. Choose Stabilize Only, Stabilize and Shutter Reduction or Shutter Reduction Only.
- Click the Track Motion button. A popup window with a progress bar will alert you that Lock & Load is doing it’s thing. After it finishes running the other options in the Effect Controls panel will no longer be grayed out. The Track Motion button will say “No Tracking Data” in small red letters but as soon as you change a parameter, that will disappear.
- RAM Preview the comp at full resolution to see how the clip looks.
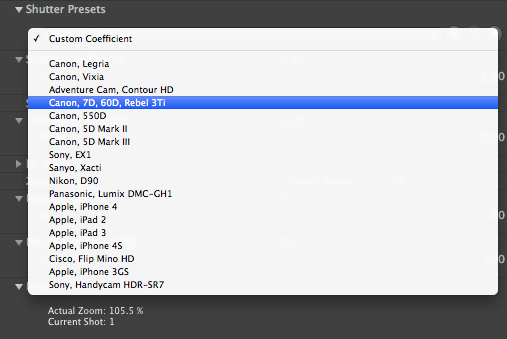
- For rolling shutter issues, under Shutter Presets, select your camera from the pull down menu. Alternatively, the menu default of Custom Coefficient allows users to set the coefficient manually.
- Under Stabilization Mode, the options are Smooth, Single Shot; Smooth, Multi Shot; and Lock Down.
- There are also options for the zoom which are pretty self-explanatory.
I had pretty good luck with Lock and Load X. The shots of my sister’s wedding and my daughter on the balance beam turned out quite nice. However, the swimming shots were a little tougher. There are options to isolate the tracking area under Tracking Area Properties. This will allow you to select a smaller portion of the screen to track, avoiding elements such as moving water. I isolated the area on the shore by adjusting the Width (%) and Height (%) and moving the Position crosshair to the center of the area I wanted to isolate. After this I needed to click the Track Motion button once again. This helped quite a bit but did not entirely fix the wobble that was mostly present in the trees. It did do a better job than some of the other stabilizers though.
One bug I found was that after setting up the Tracking Area Properties to isolate an area to track, I’d get flashes of the preview box and a message to track the footage during RAM Preview.
Overall, Lock and Load did a very good job, but it was not the best tool. You’ll have to keep reading to find out which was the best motion stabilizer I tested! I know the suspense is killing you.
CoreMelt Lock & Load X Tutorials
Lock & Load X Step by Step Tutorial
Lock & Load X for FCP X
Boris mocha
The mocha planar tracker but it’s also a great tool for motion stabilization (and rotoscoping, but that’s another article). mocha is great for keeping up with the needs of VFX artists by adding new features and hosts. They also have an immense number of tutorial videos, so you should have no trouble finding learning resources.
mocha is a standalone application, not a plug-in. mocha AE comes with Adobe After Effects but can also be purchased separately if you are running an older version of AE. mocha Pro allows the user to output to many different hosts, so if you’re using Avid, Nuke, Final Cut Pro or something else, you’ll want to use mocha Pro. mocha Pro exports data that your host NLE can import and use.
- To bring your clip into mocha AE, select your clip in the After Effects Timeline. In the top menu, choose Animation > Track in mocha AE. The full clip will open in mocha AE. It’s a good idea to set the Frame Range in the Options. Your clip duration will be represented by red brackets in the timeline in mocha.
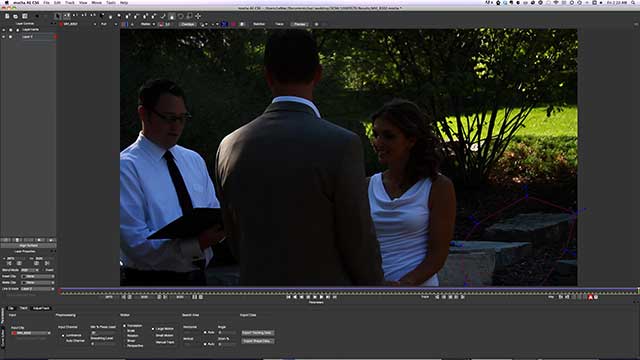
- Use the X-Spline to isolate an area of the shot that will stay constant and not move, like a rock or tree trunk. Don’t choose a person, moving water or trees waving in the breeze. The movement will be picked up and your shot will not stabilize properly. Since mocha is a planar tracker, not a point tracker, choose areas with texture in your X-Spline.
- Under Motion on the Track Tab, deselect Scale, Rotation and Shear. Only Translation should be selected because just the X and Y data is needed.
- Track forward, backward, whatever you need to do by clicking the play buttons for Track.
- Play the clip in mocha to make sure that the X-Spline area looks like it tracked properly to the area in your X-Spline.
- If it looks wrong, move your X-Spline and retrack. If it looks good, click Export Tracking Data. Choose Format: After Effects Transform Data [anchor point, position, scale and rotation] (*.txt). Click Save or Copy to Clipboard.
- Back in After Effects, go to the first frame of the clip you just tracked and select the footage. Paste, if you Copied to Clipboard, or open the text file you just saved, copy the entire document to your clipboard and then paste. Keyframes will be pasted for Anchor Point, Position, Scale and Rotation. Delete keyframes for Position, Scale and Rotation.
- There are some tricks with pans and smoothing that you can do as well and they’re in the tutorial video below.
mocha is pretty fast and does a nice job, but for ease of use, I prefer to use a plug-in that is more automated. I just prefer fewer steps.
Motion Stabilization in mocha AE & mocha Pro Tutorial
For more help see After Effects Help / Tracking and stabilizing motion
Posted by Michele


'%3e%3cg id='Final-Copy-2_2_' transform='translate(1275.000000, 200.000000)'%3e%3cpath class='st0' d='M7.4,12.8h6.8l3.1-11.6H7.4C4.2,1.2,1.6,3.8,1.6,7S4.2,12.8,7.4,12.8z'/%3e%3c/g%3e%3c/g%3e%3c/g%3e%3cg id='final---dec.11-2020'%3e%3cg id='_x30_208-our-toggle' transform='translate(-1275.000000, -200.000000)'%3e%3cg id='Final-Copy-2' transform='translate(1275.000000, 200.000000)'%3e%3cpath class='st1' d='M22.6,0H7.4c-3.9,0-7,3.1-7,7s3.1,7,7,7h15.2c3.9,0,7-3.1,7-7S26.4,0,22.6,0z M1.6,7c0-3.2,2.6-5.8,5.8-5.8 h9.9l-3.1,11.6H7.4C4.2,12.8,1.6,10.2,1.6,7z'/%3e%3cpath id='x' class='st2' d='M24.6,4c0.2,0.2,0.2,0.6,0,0.8l0,0L22.5,7l2.2,2.2c0.2,0.2,0.2,0.6,0,0.8c-0.2,0.2-0.6,0.2-0.8,0 l0,0l-2.2-2.2L19.5,10c-0.2,0.2-0.6,0.2-0.8,0c-0.2-0.2-0.2-0.6,0-0.8l0,0L20.8,7l-2.2-2.2c-0.2-0.2-0.2-0.6,0-0.8 c0.2-0.2,0.6-0.2,0.8,0l0,0l2.2,2.2L23.8,4C24,3.8,24.4,3.8,24.6,4z'/%3e%3cpath id='y' class='st3' d='M12.7,4.1c0.2,0.2,0.3,0.6,0.1,0.8l0,0L8.6,9.8C8.5,9.9,8.4,10,8.3,10c-0.2,0.1-0.5,0.1-0.7-0.1l0,0 L5.4,7.7c-0.2-0.2-0.2-0.6,0-0.8c0.2-0.2,0.6-0.2,0.8,0l0,0L8,8.6l3.8-4.5C12,3.9,12.4,3.9,12.7,4.1z'/%3e%3c/g%3e%3c/g%3e%3c/g%3e%3c/g%3e%3c/svg%3e) Your Privacy Choices Notice at Collection
Your Privacy Choices Notice at Collection