In Depth: Keying and Background Removal in Photoshop, Part 2: Primatte Chromakey

Part 2 of this multipart series on background removal covers Digital Anarchy’s Primatte Chromakey and how to use it with Photoshop for the best workflow possible.
Table of contents
- Introduction
- Digital Anarchy Primatte Chromakey Tutorial
- Digital Anarchy Primatte Chromakey Manual
- Compositing your Key
- Part 3: FXHOME PhotoKey 8 – Coming soon
Introduction
First, make sure you see Keying and Background Removal in Photoshop, Part 1: The Pre-Process. I refer to it many times in this article.
If you work in video, you may be familiar with Red Giant Primatte Keyer. Red Giant’s Primatte and Digital Anarchy Primatte Chromakey both use Primatte chromakey technology, developed by Imagica Corporation in 1982. [Wikipedia] The last update for Primatte Chromakey for Photoshop was January 2012, but it does work in current versions of Photoshop. Primatte Chromakey works best for isolating problem areas like fine hair and semi-transparent fabrics or glass. I had a tough time pulling a key on areas of the bad spill with Primatte Chromakey, but I used the pre-keying procedures that I explained in the first article and it went quickly and easily. The duo of Primatte and Photoshop together should help you key most shots cleanly. If you’re doing a lot of keying with areas of fine detail, such as the feather/hair combo in the shot I used in this example, Primatte is a life-saver and will make the tedious work go a lot faster so you can spend more time on the fun stuff!
Digital Anarchy Primatte Chromakey Tutorial
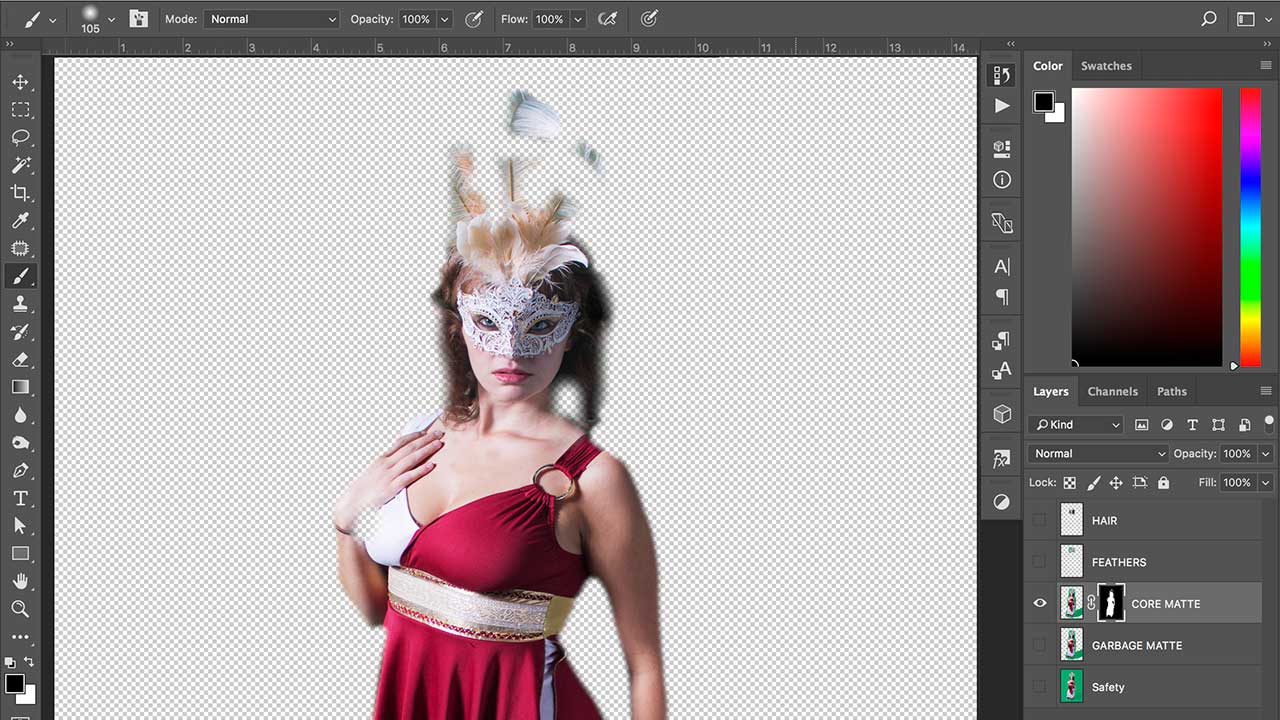
One big downside to Primatte Chromakey is that it deletes your image when you apply the filter. It doesn’t apply a mask to your layer. This goes against my non-destructive mantra. To get around this, simply keep a duplicate of your pre-processed green screen layer, before you begin keying so that you can always go back to it if something accidentally gets deleted. I’ll probably say this ten times, but it’s often easier to add a small section of something back into your shot that is keyed out due to spill or because it is green. By duplicating that layer again, adding a layer mask and making it black so you can’t see anything. Then carefully paint the area back into your shot by painting with white on the layer mask. This effectively creates a Holdout matte. This is my basic process for Primatte Chromakey.
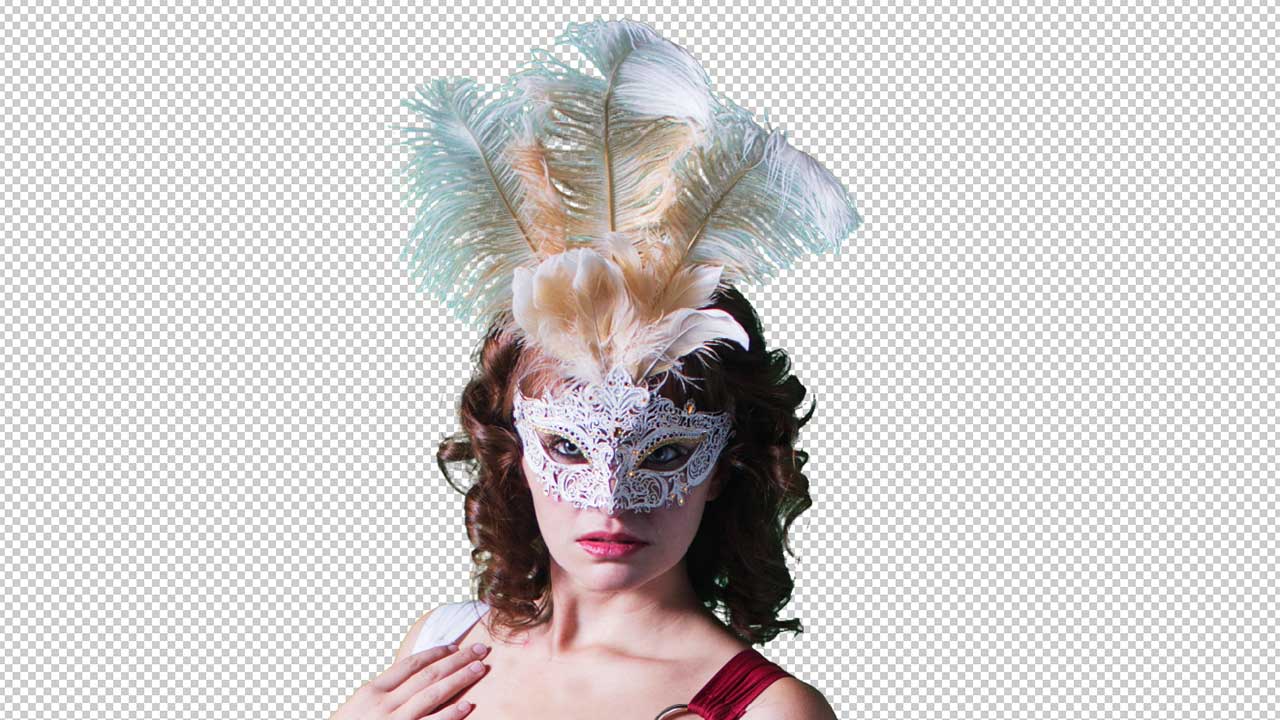
Digital Anarchy Primatte Chromakey does a nice job of pulling a clean key around tough to key areas like hair and feathers. (Model: Ariel Bug)
- Go through any pre-process steps that you may need, such as noise removal, green screen smoothing, etc. Be VERY careful to not remove or smooth over any areas of detail such as hair, fur, feathers, and so on. Save your original image in a safe place and do not overwrite it. You always want safety to go back to in case anything happens to your image during editing.
- Duplicate the pre-processed green screen layer so that you always have a safety copy to go back to if anything happens to your image. Break your layers up into a garbage matte and a core matte. You don’t really need to create edge mattes with Primatte Chromakey because you can use the Lasso tool in Photoshop and apply Primatte Chromakey to only that selected area. This will save you some time.
- Apply Primatte Chromakey to the selected area of the layer that you want to key. Make sure your layer is not named Background. If you apply Primatte Chromakey to your Background Layer, it will not work. Primatte Chromakey will open as its own application.
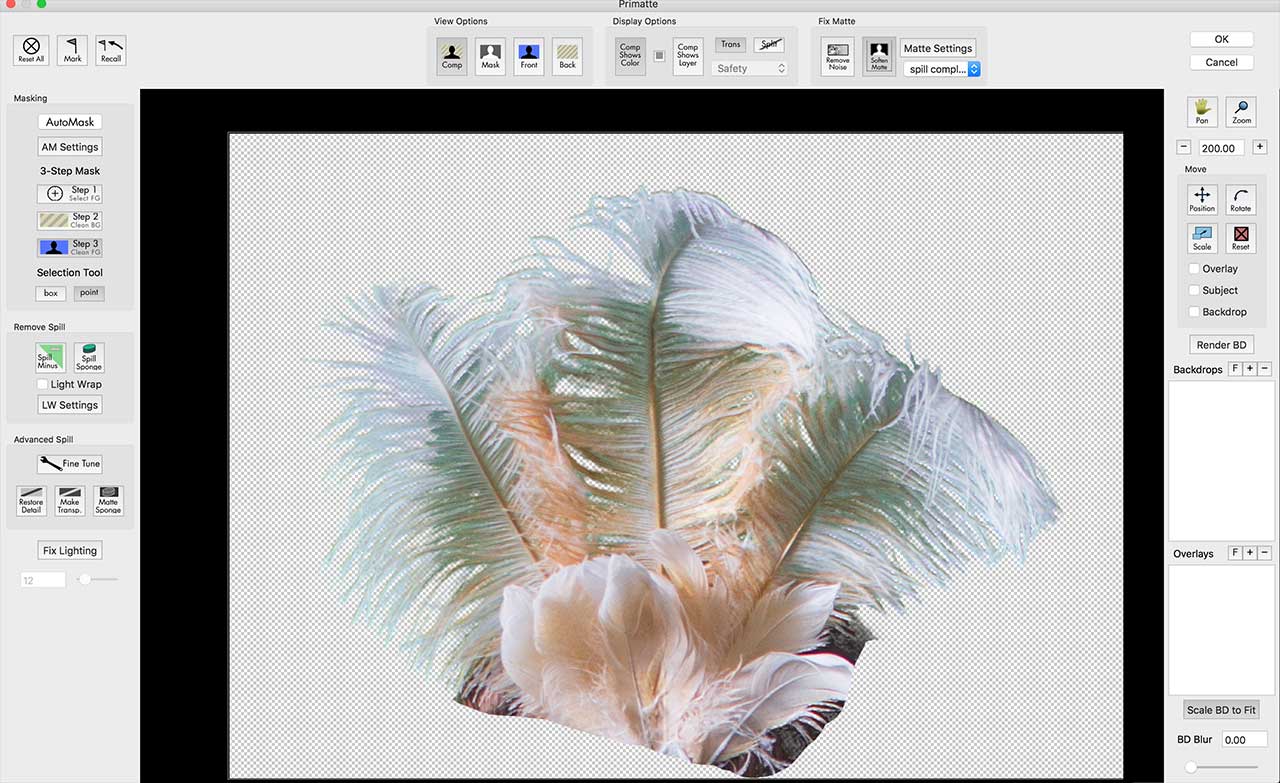
- The Primatte Chromakey background removal process is basically a 3 step process to create your matte and it’s labeled that way in the masking controls. There are buttons along the top that allow you to view the Comp, Mask, Front, and Back. There is also a Remove Noise and Soften Matte option, a Spill Sponge and Advanced Spill Settings, and a Fix Lighting button. In the case of the photo I’m working with, I was able to clean up the green screen so much that the Automask feature pretty much did a perfect job on the body, but it took a bit more work on the feathers and hair.
The AutoMask Feature did a nice job on the key of the feathers, which would have been really tough with the selection tool in Photoshop.
This is an example of a core matte layer, which focuses on the fill, not the edges. (Model: Ariel Bug)

This is the left side of the interface for the Digital Anarchy Chromakey plug-in.
- If your key needs some work, first, click “Step 1 Select FG”, and drag the Selection Tool (+/mouse) over areas of your foreground, or areas you want to keep. Then, click “Step 2 Clean BG”, and drag it over your background to remove the green. Third, click “Step 3 Clean FG”, and drag over areas that have some transparency and should not. The Selection Tool can be set to either a box or point.
- You will probably need to view your Matte so that you can really see the transparency in your matte. Go to View Options at the top of the interface and select Matte. Your image will likely have areas that are gray or black inside your white matte but don’t worry too much about it. When I look at the Matte, I can see that there are a few areas on her face and on her side that didn’t fully key, however, Primatte Chromakey did such an amazing job around the feathers, I’m going to use it as is. Any area that is partly transparent will be covered by the edge matte.

Here is the Matte in Primate Chromakey. The white area is opaque. Black areas are transparent. Grey areas have semi-transparency.
- If you have spill, click on Spill Minus or Spill Sponge and drag it over the areas with spill. Be careful not to overdo it because it can turn your subject pink, or throw off the color in another way.
- Make sure you switch the view option back to Comp before you click OK to finish and leave Primatte.
Digital Anarchy Primatte Chromakey Manual
There are several features that I didn’t cover and can be found in the manual. View the manual here.
Compositing your key
Now that your key is done, you can composite. Users can add their own backgrounds right in the Primatte software and position the foreground and background. Some users may find this very useful. I prefer to composite my layers in Photoshop, but that’s a personal preference. The whole idea of compositing is to make your foreground image look as if it belongs in your background image… as if it were originally shot that way.

The final composite
For workflow, I would recommend that you save your full key in one document and copy your keyed layer to a new document. You can scale your keyed layer and position it as needed on your background layer. Do your color grading in this composite document. If you need to go back to your original keyed layer for any reason, it will be safe and sound in this other document. Although this topic is an article on its own, here are a few things you may want to consider when compositing:
- Removing green fringe: You may be left with a bit of green around the edges of your subject and that can be remedied.
- Color correcting and color grading: Matching black levels between your foreground and background will
- Adding light wrap: bringing some of the colors from the background into the reflected light on the edges of your foreground.
- Matching grain: Match the grain between your foreground and background image. Different sources will have different grain structures, and if you scaled an image, that will also change the grain.
- Adding shadows: Make your composite believable by adding realistic shadows to your foreground that match the angle, color, and density of your background image.
- Depth of Field: Consider the distance between your foreground and background images and apply depth of field accordingly.
There’s more, of course, but this should get you started.
Part 3: FXHOME PhotoKey 8
In the next article, I’ll focus on using FXHOME’s PhotoKey 8 software to help with your keying and compositing workflow with still images.
If you’d like to learn more about green screen in motion video, as well as numerous tips that are applicable to both motion and still photography, be sure to check out the book I co-wrote with Jeremy Hanke on the subject, Green Screen Made Easy and follow us on our GSME Facebook.
This article was written by Michele Yamazaki Terpstra of Toolfarm and originally printed at MicroFilmmaker Magazine. Special thanks to DarkestGoth Magazine and their new Green Screen Art Experience for all these great photos.
Posted by Michele


'%3e%3cg id='Final-Copy-2_2_' transform='translate(1275.000000, 200.000000)'%3e%3cpath class='st0' d='M7.4,12.8h6.8l3.1-11.6H7.4C4.2,1.2,1.6,3.8,1.6,7S4.2,12.8,7.4,12.8z'/%3e%3c/g%3e%3c/g%3e%3c/g%3e%3cg id='final---dec.11-2020'%3e%3cg id='_x30_208-our-toggle' transform='translate(-1275.000000, -200.000000)'%3e%3cg id='Final-Copy-2' transform='translate(1275.000000, 200.000000)'%3e%3cpath class='st1' d='M22.6,0H7.4c-3.9,0-7,3.1-7,7s3.1,7,7,7h15.2c3.9,0,7-3.1,7-7S26.4,0,22.6,0z M1.6,7c0-3.2,2.6-5.8,5.8-5.8 h9.9l-3.1,11.6H7.4C4.2,12.8,1.6,10.2,1.6,7z'/%3e%3cpath id='x' class='st2' d='M24.6,4c0.2,0.2,0.2,0.6,0,0.8l0,0L22.5,7l2.2,2.2c0.2,0.2,0.2,0.6,0,0.8c-0.2,0.2-0.6,0.2-0.8,0 l0,0l-2.2-2.2L19.5,10c-0.2,0.2-0.6,0.2-0.8,0c-0.2-0.2-0.2-0.6,0-0.8l0,0L20.8,7l-2.2-2.2c-0.2-0.2-0.2-0.6,0-0.8 c0.2-0.2,0.6-0.2,0.8,0l0,0l2.2,2.2L23.8,4C24,3.8,24.4,3.8,24.6,4z'/%3e%3cpath id='y' class='st3' d='M12.7,4.1c0.2,0.2,0.3,0.6,0.1,0.8l0,0L8.6,9.8C8.5,9.9,8.4,10,8.3,10c-0.2,0.1-0.5,0.1-0.7-0.1l0,0 L5.4,7.7c-0.2-0.2-0.2-0.6,0-0.8c0.2-0.2,0.6-0.2,0.8,0l0,0L8,8.6l3.8-4.5C12,3.9,12.4,3.9,12.7,4.1z'/%3e%3c/g%3e%3c/g%3e%3c/g%3e%3c/g%3e%3c/svg%3e) Your Privacy Choices Notice at Collection
Your Privacy Choices Notice at Collection