Tutorial: Intro to 3D in Photoshop CS6 and CC
This tutorial will show and explain how to use the basic 3D tools and functions in Photoshop CS6/CC to create and render a piece of 3D text.
Intro to 3D in Adobe Photoshop CS6 and CC
Richard Curtis has a detailed post on using 3D in Adobe Photoshop up on his blog.
Here is the intro to his post with a link to the full post further in.
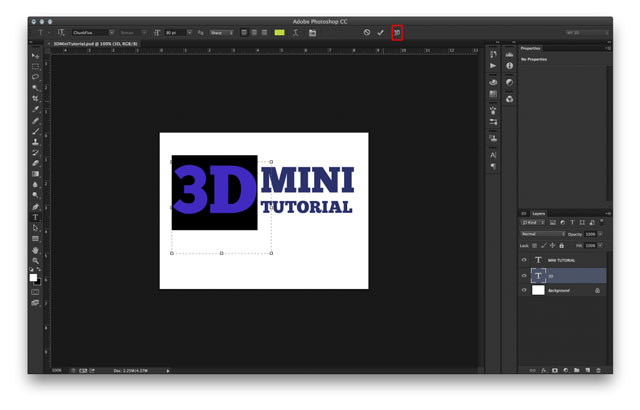
Start
- A new canvas is created in Photoshop CC (the one below is 1024px by 768px).
Creating the 3D object
- Two text objects are created with letters in each as shown below.
- At this point you can set a colour on the text, as this will be transferred to the 3D object when it is created.
- Select one of the pieces of text and click on the ‘3D’ logo (marked red) in the tool bar. Photoshop will then turn this 2D text into a 3D object. This same is performed for the second piece of text.

Create one 3D object by Merging 3D layers
- When Photoshop creates 3D objects, they are each placed into a 3D layer, as shown below. Ideally these 3D text objects should be in the same 3D layer, this will enable them to interact with each other, share lights etc.
- To merge the two 3D layers into one, both layers (marked red) are selected and menu item 3D / Merge 3D layers (marked orange) is selected.
Posted by Alicia

'%3e%3cg id='Final-Copy-2_2_' transform='translate(1275.000000, 200.000000)'%3e%3cpath class='st0' d='M7.4,12.8h6.8l3.1-11.6H7.4C4.2,1.2,1.6,3.8,1.6,7S4.2,12.8,7.4,12.8z'/%3e%3c/g%3e%3c/g%3e%3c/g%3e%3cg id='final---dec.11-2020'%3e%3cg id='_x30_208-our-toggle' transform='translate(-1275.000000, -200.000000)'%3e%3cg id='Final-Copy-2' transform='translate(1275.000000, 200.000000)'%3e%3cpath class='st1' d='M22.6,0H7.4c-3.9,0-7,3.1-7,7s3.1,7,7,7h15.2c3.9,0,7-3.1,7-7S26.4,0,22.6,0z M1.6,7c0-3.2,2.6-5.8,5.8-5.8 h9.9l-3.1,11.6H7.4C4.2,12.8,1.6,10.2,1.6,7z'/%3e%3cpath id='x' class='st2' d='M24.6,4c0.2,0.2,0.2,0.6,0,0.8l0,0L22.5,7l2.2,2.2c0.2,0.2,0.2,0.6,0,0.8c-0.2,0.2-0.6,0.2-0.8,0 l0,0l-2.2-2.2L19.5,10c-0.2,0.2-0.6,0.2-0.8,0c-0.2-0.2-0.2-0.6,0-0.8l0,0L20.8,7l-2.2-2.2c-0.2-0.2-0.2-0.6,0-0.8 c0.2-0.2,0.6-0.2,0.8,0l0,0l2.2,2.2L23.8,4C24,3.8,24.4,3.8,24.6,4z'/%3e%3cpath id='y' class='st3' d='M12.7,4.1c0.2,0.2,0.3,0.6,0.1,0.8l0,0L8.6,9.8C8.5,9.9,8.4,10,8.3,10c-0.2,0.1-0.5,0.1-0.7-0.1l0,0 L5.4,7.7c-0.2-0.2-0.2-0.6,0-0.8c0.2-0.2,0.6-0.2,0.8,0l0,0L8,8.6l3.8-4.5C12,3.9,12.4,3.9,12.7,4.1z'/%3e%3c/g%3e%3c/g%3e%3c/g%3e%3c/g%3e%3c/svg%3e) Your Privacy Choices Notice at Collection
Your Privacy Choices Notice at Collection