Understanding render options in Adobe Premiere Pro

“Adobe Premiere Pro’s export dialog features several rendering options that are not widely understood. All of them are switched off by default because they either degrade quality or increase rendering times, however they can all be useful in particular situations.” – Jon Chappell
Understanding render options in Adobe Premiere Pro

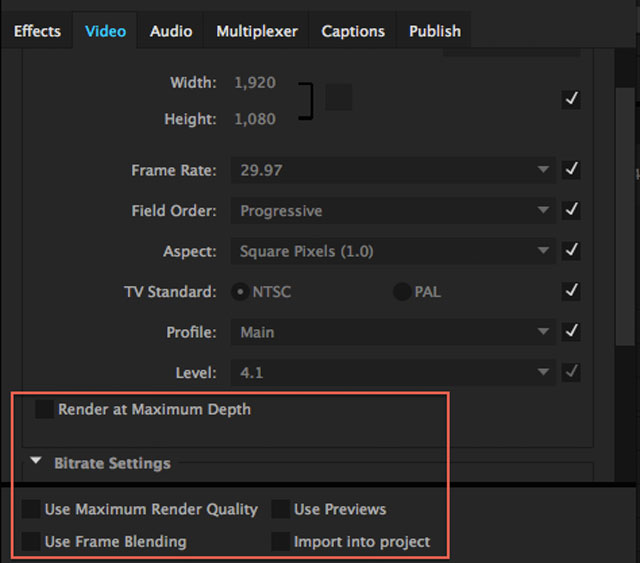
Render at Maximum Depth
This renders content at 32-bit color depth. Very few output formats actually support 32-bit color but processing at this depth can produce better quality for compositing and effects operations before being scaled back to the output format’s bit depth. It can reduce or eliminate artifacts and banding in your video but that benefit comes at the cost of an increase in processing time, so only use it when completely necessary.
You may benefit from this option in the following situations:
- Your source media has a higher bit depth than the format you are outputting to
- Your sequence contains heavy compositing or lots of layered effects (particularly layered color corrections)
- Your sequence contains very high contrast or very low contrast images (for example subtle gradients)
Maximum Render Quality
This is a high-quality resize operation that should be used when outputting to a different frame size from your sequence. It can reduce aliasing (jagged edges) when resizing images but is of no use when outputting to the same frame size. This operation significantly increases render times so only use it when resizing.
Frame Blending
This option smooths out jittery motion when exporting to a different frame rate than your sequence. While it may improve motion quality compared to not having it switched on, it’s not considered a high-quality option. You will probably get better results from exporting with the sequence frame rate and then converting in Adobe Media Encoder, Apple Compressor, a standards-conversion tool like JES Deinterlacer or a hardware conversion device like Teranex.
Use Previews
This results in reduced export times because your sequence renders files are used instead of having to re-render the sequence. This is, of course, assuming that you have a significant amount of your timeline already rendered, which may not be the case if you have a fast computer or your sequence is simple enough to be played back without rendering.
Generally, you should not use this option because it is likely to result in reduced image quality, particularly when outputting to a different format from your sequence and also because it will bypass the quality options detailed above. It should only be used where processing time is more important than image quality, such as previews or rough cuts for example, although these are likely to be simple enough that this option doesn’t significantly affect processing times.
Posted by Alicia

