

IMPORTANT NOTE: Projects created and/or saved in this version cannot be opened in the previous versions of RealityCapture.
Download demos and trial versions, product documentation, free presets and more.
RealityCapture is cutting-edge software that uses photogrammetry to create ultra-realistic 3D models from a set of images and/or laser scans. It’s currently the fastest solution available, which enables you to be more efficient and focus on your work objectives.
Create virtual reality scenes, textured 3D meshes, orthographic projections, geo-referenced maps, and much more from images and/or laser scans automatically.
For individuals and small businesses that made less than USD 1 million in revenue in the past 12 months, educational institutions and students.
For individuals and businesses that make over $1 million USD in gross annual revenue.
/seat/year
(+ applicable taxes)
For individuals and businesses that make over $1 million USD and want access to all three products: Unreal Engine, Twinmotion, and RealityCapture.
/seat/year
(+ applicable taxes)
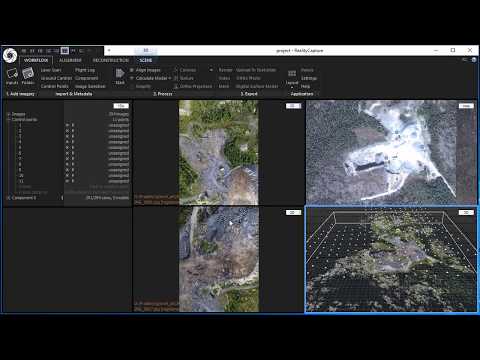
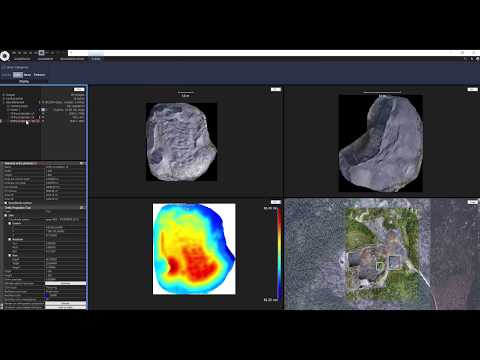
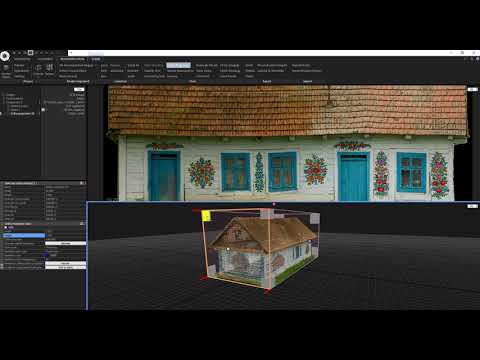
RealityCapture is a perfect solution for your mapping projects. You can create an infinite number of ortho-projections and maps. For each map, area and volume measurements are automatically calculated. Moreover, you can use several options on how to geo-reference your map and with control point experience, you are able to create hundreds of measurements for ground control points within minutes.
RealityCapture Map Wizard is basically a one-click virtual assistant in the creation of geo-referenced maps and/or models.
It is an easy and intuitive tool enabling you to have end-to-end results in one place.
It works in a few simple steps:

RealityCapture enables you to use all different types of geo-referencing like:
Coordinate system mixing: Furthermore, each ground control point or camera can be in a different coordinate system.
In fact, it has never been so easy to create a map. Just define an area and select a coordinate system. Then, press a button. Your map will be stored in the project. Afterward, you will be able to export it anytime. In other words, export your map in the form of a “True Orthographic Photograph” or a “Digital Surface Model” into:
In brief, you are not limited just to maps with your projects. You can create arbitrary orthographic projections and cross-sections. In addition, define the projection plane, size, and rotation of the projection area and get the resolution you need. All ortho-projections are saved and can be exported as an image, altitude, or depth layer. This feature is very useful for project documentation.
Create realistic assets and environments. Get the most from the speed.
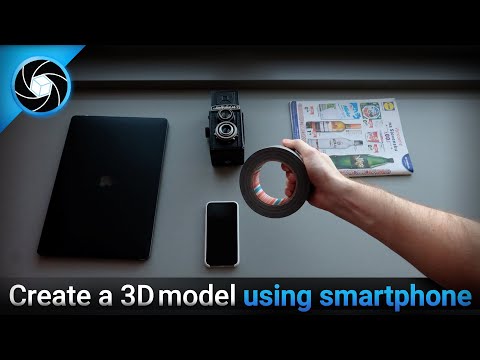
Meet your deadlines and create 3D assets 6x more efficiently than with other traditional methods. As an illustration, you can run 4 instances of RealityCapture at the same time. Truly, it’s simple. Use your phone or DSLR and capture an object from every angle.
Use photos to recreate small 3D objects, digital doubles, or big 3D environments ready to export for content-creation and artistic tools.
Bring physical objects into 3D and be creative. Build your own environment from real-world objects and create a truly immersive experience. Replace manual modeling and speed up your creative workflow with RealityCapture photogrammetry software.
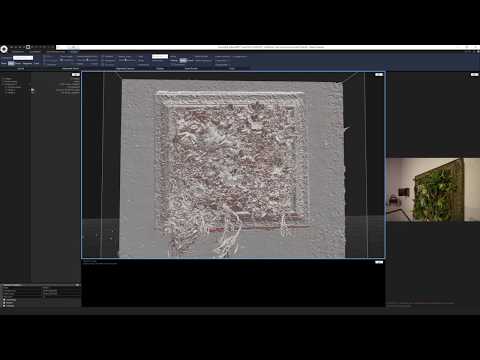
With RealityCapture you obtain clean detailed meshes with picture-perfect textures. Overall, automate your workflow with the command line to get the result even faster.
RealityCapture offers a variety of tools that helps you to finish your model. Filter unwanted parts, smooth, and simplify your mesh to achieve the best possible result. Export results in all standard formats compatible with third-party software, such as Unreal Engine, Unity, etc..
Get the most authentic digital double or 3D asset. Set a coordinate system, compute a model, decimate, texture, export all in one automated process using RealityCapture CLI.
There are different ways how to preserve coordinate systems across different scans with RealityCapture. To put it another way, it all depends on your camera setup.
If you are sure that your camera setup is fixed, then you can use pre-calibration with XMP files. By fixed we mean that your supporting structure is so strong that each camera position and orientation will remain stable (+-0.01mm and +-0.01 degrees) across different scans. Furthermore, your internal camera parameters will remain fixed, as well (no autofocus, no image stabilization, etc.). If you are not absolutely sure about the precision, you can still use XMP files set to draft mode and RealityCapture will fine-tune camera poses and calibration.
Photogrammetry is a time-saving, cost-reducing method that helps to better communicate projects and lowers risks of future errors.
For this reason, replace manual modeling and speed up your creative workflow. It’s simple. In effect, use your phone or DSLR, or drone and capture an object from every angle.
Easily edit and re-design the reality-captured models. Design a missing component that will fit perfectly to the object it was made for. A set of integrated post-processing tools will help you to fine-tune your model. In this case, filter unwanted parts, smooth, and simplify your mesh to achieve the best possible result.
With RealityCapture you obtain clean detailed meshes with picture-perfect textures. By all means, use photos to recreate from small 3D objects, large cathedrals, to whole cities. Imagine having your favorite objects in miniature size.
So, do you have some precious memories from your childhood? Perhaps family heritage or vacation memory that you would like to preserve as a 3D model? Simply take pictures of the object, turn them into 3D models with RealityCapture, and directly 3D print.
We recommend using a machine with at least 4 CPU cores, 16GB of RAM, and 1024 CUDA cores. If you do not have the NVIDIA card, you will be still able to run the application and register images, you will not be able to create a textured mesh.
The CPU is required to support SSE4.2 (Streaming SIMD Extensions 4.2) or higher.
How to find out whether you have CUDA 2.0+ update the drivers and check here: https://developer.nvidia.com/cuda-gpus
For Microsoft Windows N you will need to install Media Feature Pack for Windows. Click the following link to install it: http://www.microsoft.com/en-us/download/details.aspx?id=16546. If you are using Windows Server, then you need to install Media Foundation features.
The RealityCapture application uses state-of-the-art out-of-core algorithms for almost every task. Therefore, you do not need to worry about computer memory.
You can easily register an unlimited number of images/laser-scans on a single machine. However, it requires a specific workflow using components. In such cases, 16GB should be enough for thousands of high (36-80 MPX) resolution images. You can find more information about components workflow in the application Help, section Using components.
To align an unordered set of images into one component you will need a certain amount of RAM. The consumption depends on a count of images (irrespective of their size) and a count of features per image. If you restrict the count of features per image from default 40K to 20K, you will double the count of images which can use the same amount of RAM.
Meshing, coloring, and texturing are completely out-of-core. Hence you do not need to worry about computer RAM at all. This means that once you have even one million images or scans registered together, you can create a mesh and a texture on a machine with e.g. 16GB of RAM without any performance loss.
Performance comparison:
Here you can find a performance comparison of a specific HW equipment during processing in RealityCapture provided by Puget Systems:
https://www.pugetsystems.com/all_articles.php?filter[]=RealityCapture
Released April 23, 2024
unlockPPIProject CLI command for saving and unlocking PPI projects with the command line interface.activate, getLicense, importLicense, exportLicense. The commands will be ignored in existing CLI scripts and won’t fail.
Released November 2023
Fed up of wasting time waiting for results? Good news! Already recognized as one of the fastest photogrammetry solutions on the market, RealityCapture 1.3 has taken a significant leap forward in terms of speed and performance. The key improvement comes in the form of faster model reconstruction, up to twice as fast depending on the size of the model, while texturing is now up to three times faster than in the previous release.
Press the Start button, stand back, and watch the magic happen. In this release, we’ve optimized the workflow for generating cleaned, textured high-poly models—as well as simplified low-poly models with baked diffuse and normal maps—down to a single click. What’s not to like?
Experimental
As many users will know, the photogrammetry process typically auto-generates a large number, even thousands, of separate UV islands—which then have to be optimized if the model is to be used for games or for other real-time applications.
RealityCapture 1.3 brings an Experimental new mosaicing-based UV unwrap process that results in fewer UV islands, potentially saving time down the road.
We’re also introducing mosaicing-based texturing, which effectively uses a single original source photograph to generate the texture for each triangle on your mesh and assembles the pieces together to form the final texture. The result? Sharper, more color-accurate details on your model.
If you’re an architect, engineer, or someone else who regularly works with really large models, you may already be familiar with Nira, a platform capable of rendering massive 3D assets in real time for interactive, collaborative web-based review on any device, including smartphones and tablets.
Nira offers a fast model uploader and multi-threaded model streaming. It can also be used to edit RealityCapture models, optimizing and cleaning each element individually.
In RealityCapture 1.3, you can directly upload your models to your Nira account, supplementing our existing support for uploading to Sketchfab and Cesium.
These are just the highlights of the release. You can see everything that’s new in the release notes, and in our online course on the Epic Developer Community. We hope you enjoy RealityCapture 1.3. Don’t forget you can try it out for free using our pre-licensed sample datasets.
Released June 13, 2023
This is the overview. Check out the release notes for the full rundown of what’s included
Meshes of large objects such as buildings can be huge. Previously, RealityCapture’s ability to render massive objects like this maxed out at 40 million triangles.
Thanks to new enhancements we’ve made to the 3D renderer, you can now view meshes of hundreds of millions of triangles directly in the RealityCapture viewport—depending on the power of your workstation’s CPU, GPU, and VRAM, of course.
What’s more, cleaning up these large-scale models is now easier, because the model won’t switch to a dense point cloud view once the mesh exceeds 40 million triangles.
It’s now much faster to convert your photos into a mesh—and the larger the dataset, the greater the speedup.
Those working with smaller datasets of up to 200 photos can expect processing time to be around 20% faster. For anyone working with larger datasets of around 10,000 photos—particularly on powerful professional machines—it’s possible to achieve results that are up to 80% faster.
RealityCapture can now more efficiently harness the power of multicore CPUs in the reconstruction process—expect the best results on CPUs with more than 64 threads.
We’ve also made a bunch of improvements under the hood for this release that will provide more accurate textures, help avoid losing data in cache crashes, ensure smoother export to other tools, and suppress pop-ups when RealityCapture is running in headless mode.
Check out the release notes for the full rundown of what’s included, and watch the online course on EDC for a tour of the new features.
Download RealityCapture 1.2.2 today to experience faster processing, view bigger meshes, and explore workflow improvements firsthand.
For those looking to learn the ropes, we’ve made it easier to access our documentation and learning materials—they’re now accessible via browser as well as in the app. Check them out!
This release brings several improvements to your pipeline, including an automated workflow for transferring large datasets from RealityCapture to Unreal Engine 5, and under-the-hood changes for easier cloud deployment. It also includes the ability to construct models and export them to Sketchfab at a limited resolution without using PPI credits, from where you can share, sell, and download them under the terms of the Sketchfab EULA; after your first upload to Sketchfab, you will automatically get a one-year Sketchfab Pro account.
This release brings several improvements to your pipeline, including an automated workflow for transferring large datasets from RealityCapture to Unreal Engine 5, and under-the-hood changes for easier cloud deployment. It also includes the ability to construct models and export them to Sketchfab at a limited resolution without using PPI credits, from where you can share, sell, and download them under the terms of the Sketchfab EULA; after your first upload to Sketchfab, you will automatically get a one-year Sketchfab Pro account.
July 2021
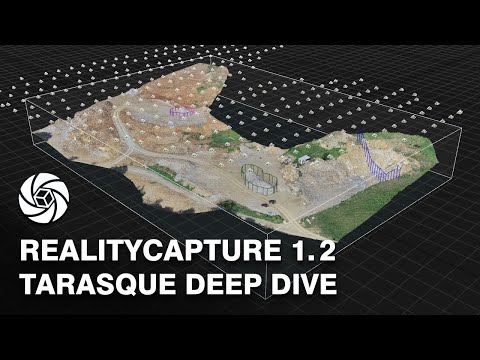
New RealityCapture 1.2 Tarasque release now support ortho-mosaicking, contours, cross sections, height profiles, and many more exciting features! Learn more in the updates tab.
This new software release aims for field working professionals requiring the highest precision and speed. We have introduced many new exciting features as well as an improved easy-to-navigate ribbon.
IMPORTANT NOTE: Projects created and/or saved in this version cannot be opened in the previous versions of RealityCapture.
Highlights:
December 7, 2020
IMPORTANT NOTE: Projects created and/or saved in this version cannot be opened in the previous versions of RealityCapture.
Date: September 2, 2020
IMPORTANT NOTE: Projects created and/or saved in this version cannot be opened in the previous versions of RealityCapture.

This tutorial explains scanning best practices (without expensive equipment) and how to use the Mesh to MetaHuman plug-in in RealityCapture.
More...
This RealityCapture tutorial explains how to transfer textures from one model to another using the "Texture Reprojection Tool". It gives you much faster results than regular texturing in RealityCapture.
More...
Learn about RealityCapture control points and what they're good for, what they're not good for, and how to place them in 2D and 3D views.
More...
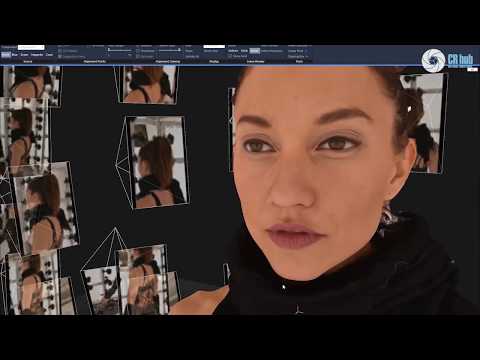
In this 4 part series of tutorials, learn how to create a detailed 3D model in RealityCapture. Jakub from Capturing Reality walks you through the whole process from beginning to end.
More...'%3e%3cg id='Final-Copy-2_2_' transform='translate(1275.000000, 200.000000)'%3e%3cpath class='st0' d='M7.4,12.8h6.8l3.1-11.6H7.4C4.2,1.2,1.6,3.8,1.6,7S4.2,12.8,7.4,12.8z'/%3e%3c/g%3e%3c/g%3e%3c/g%3e%3cg id='final---dec.11-2020'%3e%3cg id='_x30_208-our-toggle' transform='translate(-1275.000000, -200.000000)'%3e%3cg id='Final-Copy-2' transform='translate(1275.000000, 200.000000)'%3e%3cpath class='st1' d='M22.6,0H7.4c-3.9,0-7,3.1-7,7s3.1,7,7,7h15.2c3.9,0,7-3.1,7-7S26.4,0,22.6,0z M1.6,7c0-3.2,2.6-5.8,5.8-5.8 h9.9l-3.1,11.6H7.4C4.2,12.8,1.6,10.2,1.6,7z'/%3e%3cpath id='x' class='st2' d='M24.6,4c0.2,0.2,0.2,0.6,0,0.8l0,0L22.5,7l2.2,2.2c0.2,0.2,0.2,0.6,0,0.8c-0.2,0.2-0.6,0.2-0.8,0 l0,0l-2.2-2.2L19.5,10c-0.2,0.2-0.6,0.2-0.8,0c-0.2-0.2-0.2-0.6,0-0.8l0,0L20.8,7l-2.2-2.2c-0.2-0.2-0.2-0.6,0-0.8 c0.2-0.2,0.6-0.2,0.8,0l0,0l2.2,2.2L23.8,4C24,3.8,24.4,3.8,24.6,4z'/%3e%3cpath id='y' class='st3' d='M12.7,4.1c0.2,0.2,0.3,0.6,0.1,0.8l0,0L8.6,9.8C8.5,9.9,8.4,10,8.3,10c-0.2,0.1-0.5,0.1-0.7-0.1l0,0 L5.4,7.7c-0.2-0.2-0.2-0.6,0-0.8c0.2-0.2,0.6-0.2,0.8,0l0,0L8,8.6l3.8-4.5C12,3.9,12.4,3.9,12.7,4.1z'/%3e%3c/g%3e%3c/g%3e%3c/g%3e%3c/g%3e%3c/svg%3e) Your Privacy Choices Notice at Collection
Your Privacy Choices Notice at Collection