A Beginner’s Guide to Automation in Pro Tools
Joe Albano is a musician, engineer, and producer in NYC. In this article he posted on Ask.Audio, he explains how to add dynamic changes to the mix by utilizing Automation in Pro Tools. Joe discusses realtime vs. offline, as well as Automation Modes. Here's an excerpt:
Even before DAWs took over the recording industry, Automation was a widely-used tool in mixing, at least on the large-format consoles that offered it. Nowadays, every DAW lets the engineer add dynamic changes to the mix, for just about every parameter, from basic functions—Channel Volume, Mute, Pan, and Sends—to the various plug-in knobs and controls. Pro Tools has an especially comprehensive set of Automation features, but for this article, I’m just going to cover the basics—an introductory primer to using Automation.
Automation Displays
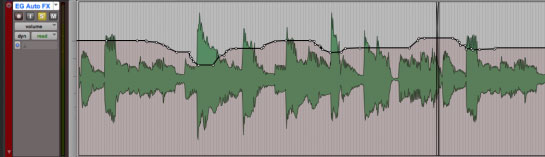
All DAWs display Automation data as a line superimposed on a track’s waveform (Fig 1).
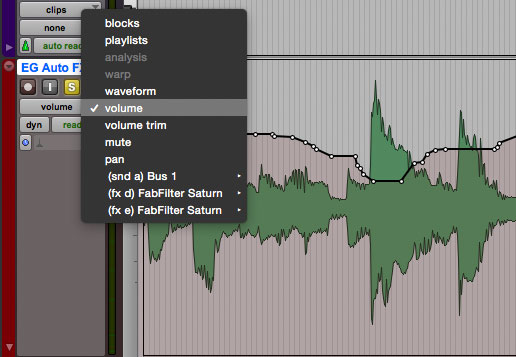
Fig 1 Automation data (Channel Fader) in a track in Pro Tools.You choose what type of Automation to view from the Track View Selector mini-menu in each Tracks’ header (Fig 2).
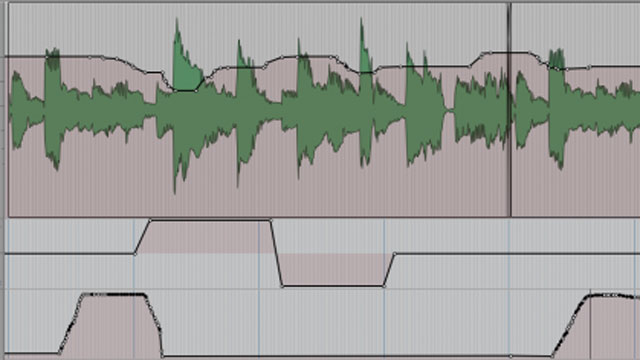
Fig 2 Automation types / display optionsEach track line shows only one type of Automation curve—i.e. volume or pan, etc.—but you can open multiple sub-lanes to see several Automation curves at once (Fig 3).
Fig 3 Multiple Automation lanes for a single track.

Joe's tutorial on Ask.Audio has lots more to offer than what I can show here. If you are new to Avid Pro Tools or just need a refresher, it's definitely worth the read.
Posted by Michele


'%3e%3cg id='Final-Copy-2_2_' transform='translate(1275.000000, 200.000000)'%3e%3cpath class='st0' d='M7.4,12.8h6.8l3.1-11.6H7.4C4.2,1.2,1.6,3.8,1.6,7S4.2,12.8,7.4,12.8z'/%3e%3c/g%3e%3c/g%3e%3c/g%3e%3cg id='final---dec.11-2020'%3e%3cg id='_x30_208-our-toggle' transform='translate(-1275.000000, -200.000000)'%3e%3cg id='Final-Copy-2' transform='translate(1275.000000, 200.000000)'%3e%3cpath class='st1' d='M22.6,0H7.4c-3.9,0-7,3.1-7,7s3.1,7,7,7h15.2c3.9,0,7-3.1,7-7S26.4,0,22.6,0z M1.6,7c0-3.2,2.6-5.8,5.8-5.8 h9.9l-3.1,11.6H7.4C4.2,12.8,1.6,10.2,1.6,7z'/%3e%3cpath id='x' class='st2' d='M24.6,4c0.2,0.2,0.2,0.6,0,0.8l0,0L22.5,7l2.2,2.2c0.2,0.2,0.2,0.6,0,0.8c-0.2,0.2-0.6,0.2-0.8,0 l0,0l-2.2-2.2L19.5,10c-0.2,0.2-0.6,0.2-0.8,0c-0.2-0.2-0.2-0.6,0-0.8l0,0L20.8,7l-2.2-2.2c-0.2-0.2-0.2-0.6,0-0.8 c0.2-0.2,0.6-0.2,0.8,0l0,0l2.2,2.2L23.8,4C24,3.8,24.4,3.8,24.6,4z'/%3e%3cpath id='y' class='st3' d='M12.7,4.1c0.2,0.2,0.3,0.6,0.1,0.8l0,0L8.6,9.8C8.5,9.9,8.4,10,8.3,10c-0.2,0.1-0.5,0.1-0.7-0.1l0,0 L5.4,7.7c-0.2-0.2-0.2-0.6,0-0.8c0.2-0.2,0.6-0.2,0.8,0l0,0L8,8.6l3.8-4.5C12,3.9,12.4,3.9,12.7,4.1z'/%3e%3c/g%3e%3c/g%3e%3c/g%3e%3c/g%3e%3c/svg%3e) Your Privacy Choices Notice at Collection
Your Privacy Choices Notice at Collection