Adjustment Brush in Photoshop Camera Raw
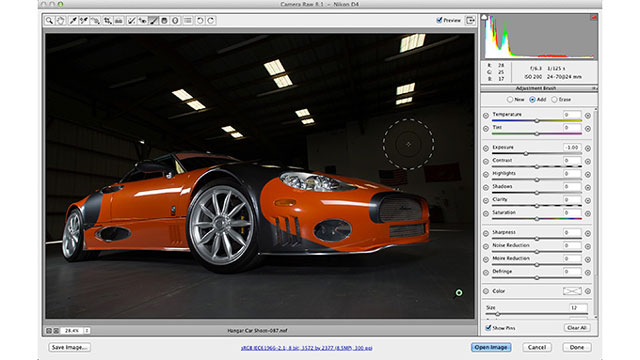
Layers Magazine posted this easy to follow tutorial, created by Scott Kelby from KelbyOne.com, that explains the best way to use the powerful Adjustment Tool to make your Camera Raw images pop.
Here's an excerpt:
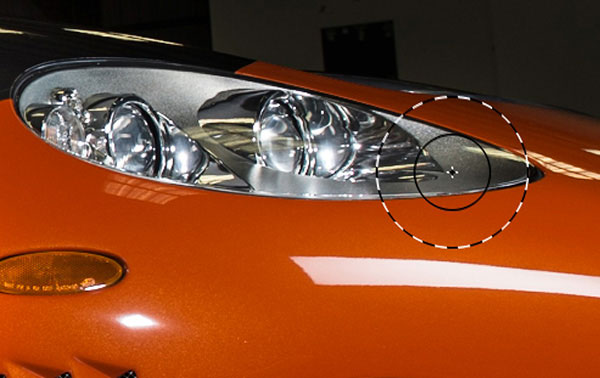
“AUTO MASK: 90% OF THE TIME, IT’S AWESOME!
If the brush seems a little slow, it’s probably because Auto Mask is turned on. Auto Mask tries to sense the edges of areas to keep you from accidentally painting something you don’t want to paint. For example, in this case, if you were brightening the area around the headlamps, it would keep you from brightening the orange paint on the car. Auto Mask is controlled by the crosshair in the center of the brush. As long as you keep that crosshair within the silver headlamp area, it will ignore the orange paint surrounding it, even if the brush itself extends into the orange paint.
Auto Mask is really pretty amazing (I wish it were in regular Photoshop). It’s great for small areas that you want to adjust, and it’s super handy when you’re painting near the edges of anything. Auto Mask has to do a lot of math as it analyzes the area beneath that crosshair, and that makes the brush move slower as you paint. That’s why you might find it helpful to turn Auto Mask off when you’re painting large areas like the floor in this example, because the brush will paint much faster. To turn it off, either uncheck the Auto Mask box near the bottom of the Adjustment Brush panel, or just press the letter M on your keyboard.”
Learn More about Adobe Photoshop
Posted by Kim Sternisha

'%3e%3cg id='Final-Copy-2_2_' transform='translate(1275.000000, 200.000000)'%3e%3cpath class='st0' d='M7.4,12.8h6.8l3.1-11.6H7.4C4.2,1.2,1.6,3.8,1.6,7S4.2,12.8,7.4,12.8z'/%3e%3c/g%3e%3c/g%3e%3c/g%3e%3cg id='final---dec.11-2020'%3e%3cg id='_x30_208-our-toggle' transform='translate(-1275.000000, -200.000000)'%3e%3cg id='Final-Copy-2' transform='translate(1275.000000, 200.000000)'%3e%3cpath class='st1' d='M22.6,0H7.4c-3.9,0-7,3.1-7,7s3.1,7,7,7h15.2c3.9,0,7-3.1,7-7S26.4,0,22.6,0z M1.6,7c0-3.2,2.6-5.8,5.8-5.8 h9.9l-3.1,11.6H7.4C4.2,12.8,1.6,10.2,1.6,7z'/%3e%3cpath id='x' class='st2' d='M24.6,4c0.2,0.2,0.2,0.6,0,0.8l0,0L22.5,7l2.2,2.2c0.2,0.2,0.2,0.6,0,0.8c-0.2,0.2-0.6,0.2-0.8,0 l0,0l-2.2-2.2L19.5,10c-0.2,0.2-0.6,0.2-0.8,0c-0.2-0.2-0.2-0.6,0-0.8l0,0L20.8,7l-2.2-2.2c-0.2-0.2-0.2-0.6,0-0.8 c0.2-0.2,0.6-0.2,0.8,0l0,0l2.2,2.2L23.8,4C24,3.8,24.4,3.8,24.6,4z'/%3e%3cpath id='y' class='st3' d='M12.7,4.1c0.2,0.2,0.3,0.6,0.1,0.8l0,0L8.6,9.8C8.5,9.9,8.4,10,8.3,10c-0.2,0.1-0.5,0.1-0.7-0.1l0,0 L5.4,7.7c-0.2-0.2-0.2-0.6,0-0.8c0.2-0.2,0.6-0.2,0.8,0l0,0L8,8.6l3.8-4.5C12,3.9,12.4,3.9,12.7,4.1z'/%3e%3c/g%3e%3c/g%3e%3c/g%3e%3c/g%3e%3c/svg%3e) Your Privacy Choices Notice at Collection
Your Privacy Choices Notice at Collection