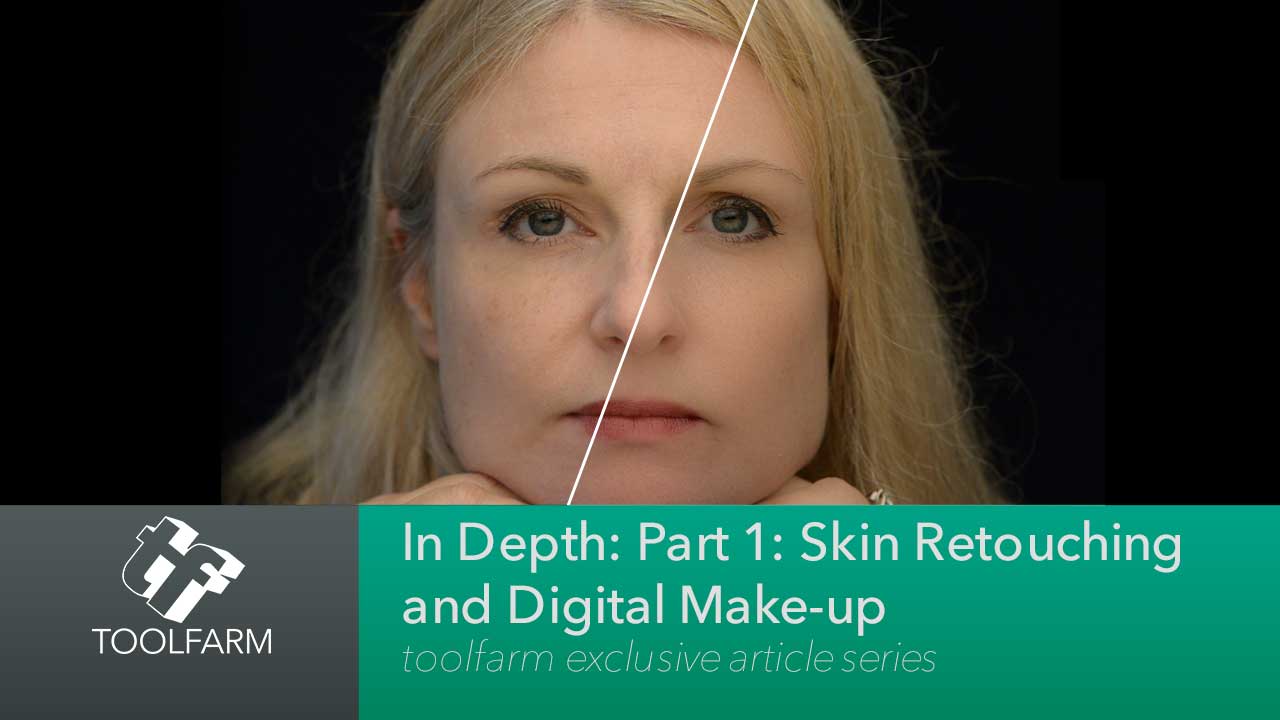
In Depth: Skin Retouching and Digital Makeup, Part 1
Note: This is an old article and some products have been discontinued. We may update this article in the future, however.
Table of contents
Introduction to Skin Retouching and Digital Makeup
This is not an article about creating unachievable perfection.
Color Correction and Skin Tones
Photoshop Skin Retouching Tutorials
Other Articles in the Series and a FREE Toolfarm Exclusive Plug-in
Introduction to Skin Retouching and Digital Makeup
Yesterday I saw a music video, Try by Colbie Caillat, a video response to her image constantly being Photoshopped by the media. I get it. The standards of beauty that have been cultivated in the media are unachievable for the majority of women who have actual lives to lead and don’t have time, money, or patience for a personal trainer or weekly visits to the salon. Who honestly would want to exist as a blemish-less, thin Barbie doll, with enhanced lips, hips, and breasts to fit this ideal? Not me. I know that this flawless standard can lead to low-self esteem, eating disorders, and worse in women and even some men. It’s not a laughing matter and I just want to say at the beginning of this article that I’m not condoning these types of alterations.
What this article is about is skin retouching to fix real problems. The make-up job on your actress may have been sub-par or non-existent. There could be harsh lighting that isn’t doing the actor any favors. Maybe the heat of the lights caused issues with the makeup. Perhaps you need to remove pimples from your teenage actor experiencing a bad breakout mid-production on your film. You may need to remove freckles or sunburn from your actor who spent too many hours in the sun. Or, maybe need to do a flashback to where the actor is younger and needs to smooth fine wrinkles. You may need to brighten the complexion and bags under the eyes of an actor showing the evidence of a great party last night. Most of the time, there’s no need for perfection, just a better version of what you have. The idea is to improve skin without losing texture.
 Inspirations: Nouveau Parfüm – BoggiThis video makes quite a statement about the standards of beauty! It shows an artist using non-existent Photoshop-type digital retouching software to change the appearance of the Hungarian singer to look glamorous.
Always use a light touch!
I may be getting ahead of myself here since we haven’t even gotten into the meat of the article, but I really want to stress this point. Don’t over-process your footage and blur the detail. It’s entirely possible to downplay skin problems while retaining texture with the right tools. Unless you’re shooting a Barbara Walters interview, there’s no need to use such soft focus.
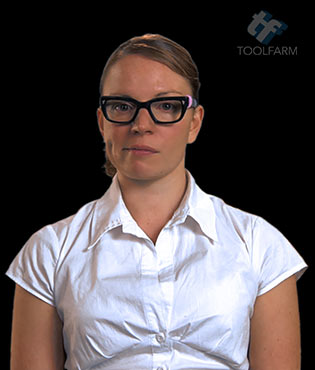
Slide left and right on the image to see the before and after comparison.

Isolating Skin Tones
Whether you are adjusting tones, smoothing skin or fixing blemishes, you’ll need to isolate skin tones so you don’t affect all of your footage. You don’t want to blur or affect the eyes, glasses, hair or other elements of your talent when you’re smoothing skin or adjusting skin tones.
Built-in Skin Detection Tools
Many plug-ins have built-in skin detection tools which mainly work on the basis of a key of the skin color. Some work quite well, others are not so great. Note: The skin detection tools have a tough time if other elements in the shot are close in color to the skin tones, such as a blond-haired pale skinned person or a dark-skinned person with dark hair.
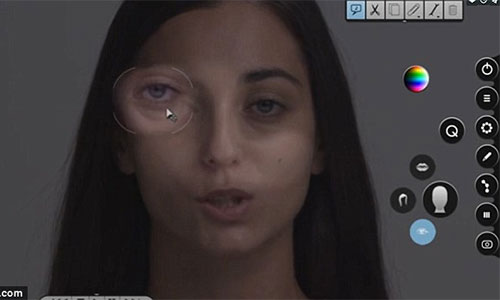
Although part 2 of this article will go into many of the great plug-ins for skin smoothing, here are a couple of examples of skin detection in plug-ins.
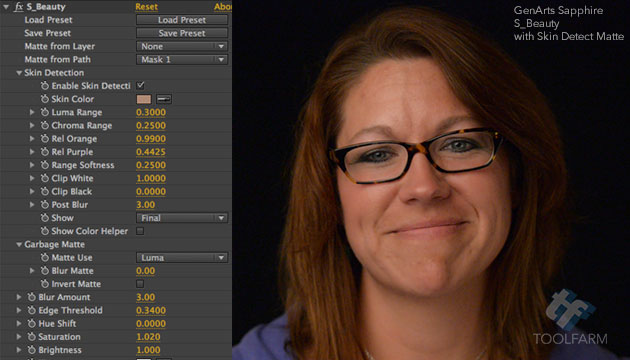
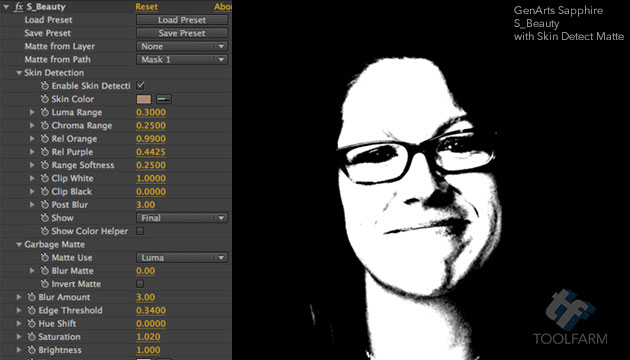
Below is an example of GenArts Sapphire S_Beauty’s built-in Skin Detection tool with a before and after. Slide left and right on the image to see the comparison.
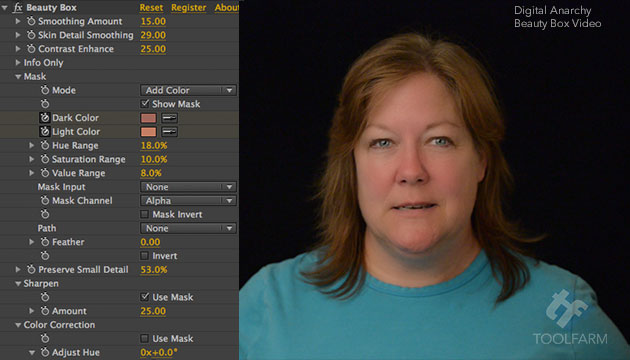
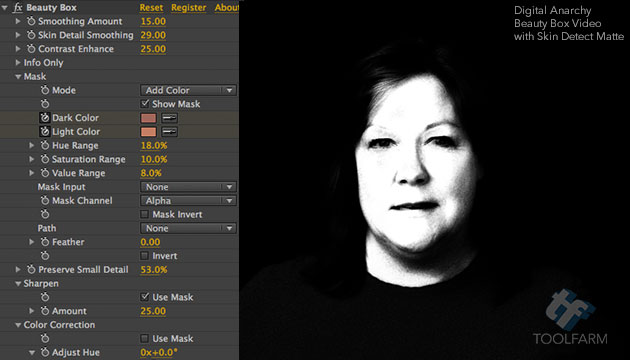
Here is another example with Digital Anarchy Beauty Box Video. The two products work similarly but have different settings. You can use a mask with both of these plug-ins too, to isolate skin tones from anything else in the shot that is being picked up by the skin detection tools. I do not have a mask in either of these shots.
Note: Be aware of light from one side and uneven lighting with skin detection tools and keying.
Sometimes it’s not possible to select one skin tone because of shadows. If a shot uses Rembrandt lighting, for example, one side of your actor will be more heavily lit.
There are ways to get around this. You can try applying multiple instances of the skin smoothing filter, and selecting different tones with built-in skin detection tools. You’ll need to blend these areas carefully. What I would recommend is using the method described below to track and isolate skin tones with an articulated matte.
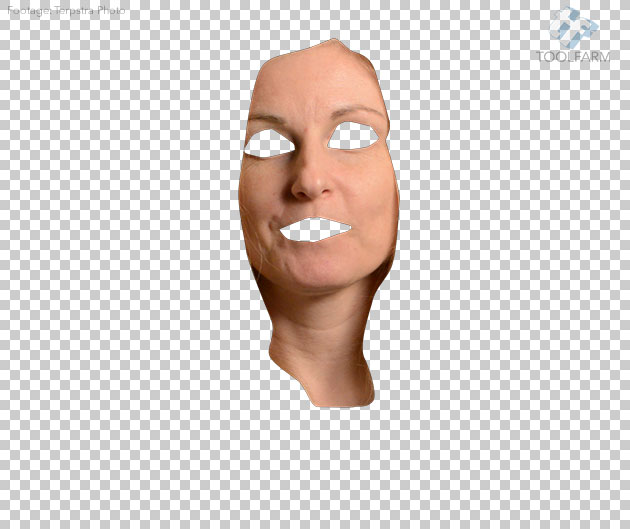
Track and Isolate Skin First with an Articulated Matte
Some tools have an option to use a matte layer or mask but about half do not. Some have skin detection and matte tools in plug-ins that work quite well, but when fixing skin on someone who has hair and skin that are similar in color (like me!), the hair is often affected. I’ve found that I have the most flexibility and least frustration if duplicate the footage into two layers. The bottom layer will remain as is. The top layer will contain a rotoscoped, articulated track matte, or garbage matte, of the skin.
Slide left and right on the image to see the before and after comparison. It looks a bit creepy but taking the time to create this mask will really save you time in the long run.
More info:
mocha Pro
Price: $1,495
Host Support mocha Pro:
mocha is a standalone application but the track and roto data can be output to a number of programs. Details are in the system requirements.
Demo: Click here
To create this skin matte, I’d recommend taking footage into mocha and bringing in the rotoscoped face shape, with features like the eyes and lips removed. mocha is a fantastic planar tracker and works amazingly well for creating a matte layer for beauty work. Either use it as is on a separate layer or if the skin smoothing plug-in that you’re using contains options to use a matte layer, you can utilize the data that way.
The matte can be feathered too so that it blends nicely. If you paste the mocha Shape Data to a Mask layer in After Effects, tap the F key to bring up the Feather attribute and adjust as needed. Alternately, if you paste as mocha Shapes, you can soften the alpha by applying a Channel Blur and increasing the value for Alpha Blurriness. There are other plug-ins that will blur your alpha but Channel Blur works great for this purpose.
Incidentally, CoreMelt SliceX for Final Cut Pro X is a great tool for smoothing skin and has mocha built in, but I’ll get to that in part two of this article.
Another benefit of having your skin on a separate layer from the rest of the scene is that you can turn down the opacity if the effect is too strong, and bring some of that detail back into the shot. You can also try using layer Modes such as Lighten or Darken to have the retouching only on certain areas.
Mary Poplin, the Product Specialist for Imagineer, did a webinar about a year ago on digital makeup and retouching. She covers the planar tracking for beauty work, blemish removal, and skin smoothing, the Object Remove module and clean plates insert module with Gridwarp, blending clean plates with original plates and of course, time-saving techniques.
Webinar: Digital Makeup & Retouching with Mocha and Adobe After Effects
mocha Workflow tip! If you have a long clip of footage in After Effects that you’ve trimmed, and then bring that into mocha AE, you could very well have issues with pasting in the exported Shape Data. It may not paste in the right place on your timeline, even if you’re positioned at the exact spot in the timeline. First, export a movie of only the portion that you need and bring that into mocha for tracking. Export or copy the tracking data and apply to the short clip, or match it into the longer original clip, if you wish.
Isolate Skin Tones with a Key for Easier Skin Retouching
Another way to isolate skin tones is by using a key. You can use any keyer, really. For a quick overview of the process, I used Keylight, which ships with After Effects.
There are multiple ways to do this but in this video tutorial, I used Keylight in After Effects. The same process can be used in other host applications and other keyers, so hopefully, you’ll get the gist. I used a Box Blur to soften the skin texture but your favorite skin retouching plug-in can be used on the blurred layer instead.
Color Correction and Skin Tones
In chapter 2 of my book Plug-in to After Effects, Eric Escobar, award-winning writer, director and producer, was interviewed about his color grading routine. He explains:
Generally, a color grade on a shot is done in three or four steps:
- Primary correction: set white point, black point, gain level, lift level, gamma level.
- Secondary correction: skin tones.
- Secondary correction: other elements (change production design by recoloring walls, etc.)
- Apply a final look: applied to all shots in the scene.
Work in 16-bits per channel color space, not 8-bits per channel.
You’ll have smoother results.
- 8-bit provides a maximum of 256 shades each of red (8), green (8), and blue (8) for an RGB image of 24 (8×3).
- 16-bits per channel allows for a lot more colors per channel – 32,769 to be exact. and an RGB image of 48 bits (16×3).
Photoshop Tutorial – Difference between 8-Bit and 16-Bit Bit Depth
Yes, it’s a Photoshop tutorial but this applies to any video editing software.
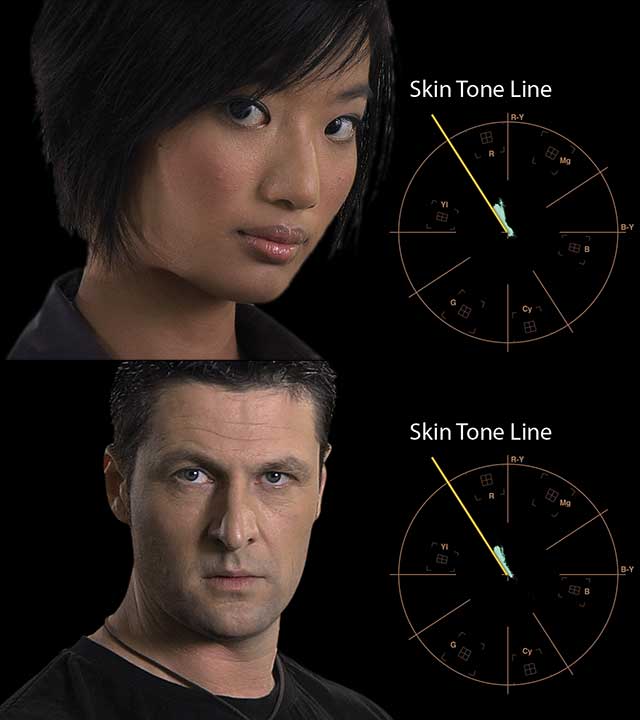
Keep Skin Tones in the Flesh Line or Skin Tone Line
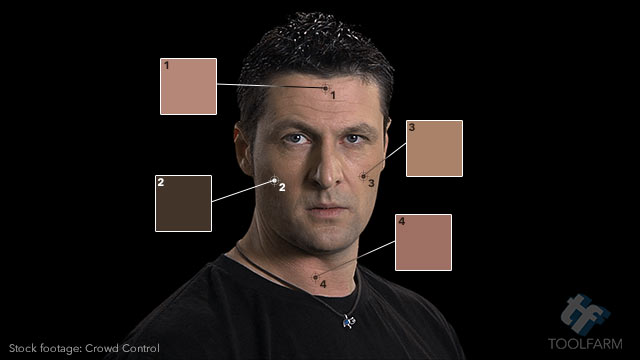
I know, ‘Flesh Line’ sounds like the name of a death metal band, so we’ll stick to the term ‘Skin Tone Line’ here. Did you know that regardless of a person’s ethnicity, skin tones generally fall into the same proximity on a vectorscope? I wrote about this in chapter 2 of Plug-in to After Effects: “This area is known as the skin tone line, flesh line or i-line and extends in a 45° angle from the center to the upper left.” When adjusting skin tones or using plug-ins or filters that color the entire frame of the video, keep an eye on those skin tones. You don’t want them to become unnatural.
Give your talent some warmth
Adjust the saturation of the skin to give alternate looks. Give your talent a little tan or warm skin tones, just don’t overdo it! You can also bring skin saturation down to represent coldness or dying.
 Here’s the original shot with some basic touch up with no change in saturation. | 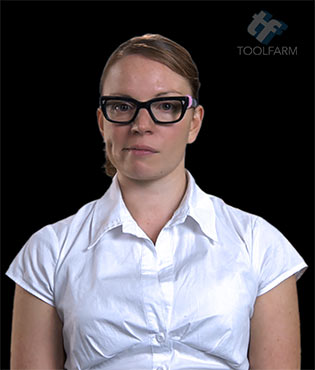 Slightly boosted saturation, isolated to the skin, warms skin tones. |
 Too much saturation gives the illusion that the talent went wild with the fake tanner. |  If you take the saturation down too much, you may end up with Edward Cullen’s love child. |
Smoothing Skin and Skin Retouching
Blemish Removal with After Effects Remove Grain
This is a fairly old tutorial (2006!) from Andrew Kramer of Video Copilot, but the technique still applies to the current version of After Effects. Andrew shows some tricks on removing blemishes using AE Remove Grain. From my own experience, while this works fairly well, AE Remove Grain can be very slow.
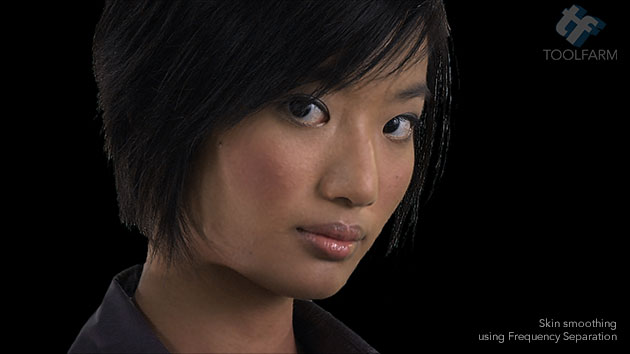
Frequency Separation
Frequency Separation is a fantastic technique often used in Photoshop. It takes the textures and puts them on one layer and puts the tone and color on another layer. This is great to work on blotchiness or small wrinkles, it’s great for that.
Here’s a tutorial explaining the technique in Photoshop.
Is there a way to do this in After Effects or your favorite NLE? I’ve come up with this basic method in After Effects. It’s not easy but the results were decent. This tutorial is not for newbies but for someone with a decent amount of experience in After Effects because it’s not exactly easy. I want to give a special thanks to Darby Edelen and an old post on the Creative Cow forums which helped me through the first portion of creating the faux High pass filter.
The idea here is to put the fine detail on a single layer, the blur on another layer and then adjust the visibility and Modes of the two layers to improve the look while keeping the detail.
Note: I really wanted to get this article online asap so I didn’t record a video tutorial, but if it’s something you’re interested in seeing, let us know and I’d be happy to create one. Here are the steps in text format. This seems like a lot of work and it would be much easier to use a plug-in, and I’m not just saying that because I work for a plug-in reseller. It’s a lot of messing and tweaking!
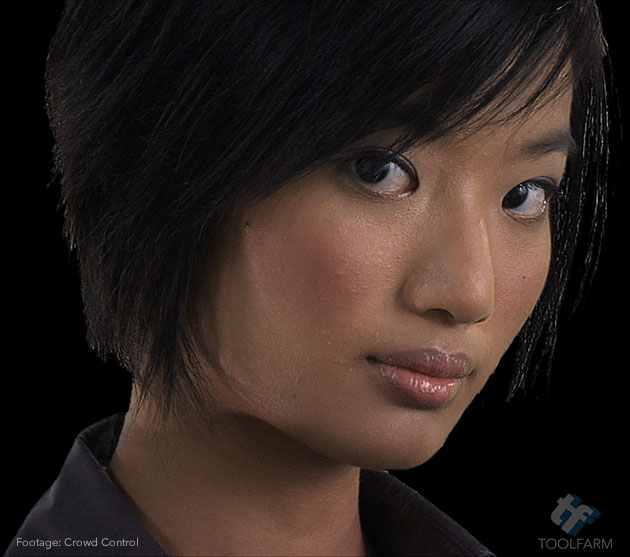
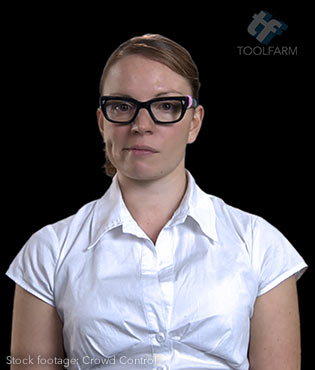
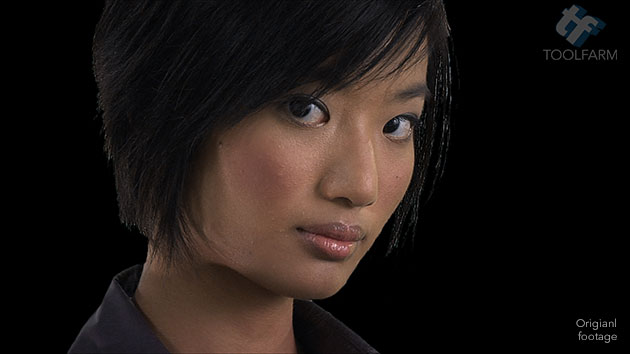
The footage of this woman is over-sharp, giving her the look of rough skin when it is likely it’s not nearly this bad. I say that because her hair is very sharp. This footage was from Crowd Control and was all pre-keyed, so I understand that they wanted sharp edges, however, it didn’t help her skin!
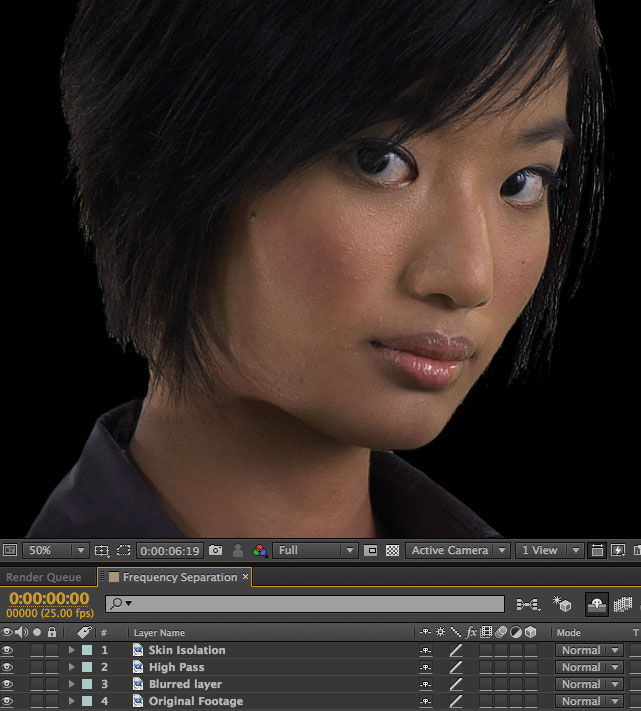
1. Set up your Comp and Footage Layers: Create a comp called “Frequency Separation” Drag your footage into your comp and duplicate your layer 4 times. Name them as below.
- Top layer – Skin Isolation Layer
- Second layer – High Pass
- Third layer – Blurred layer
- Bottom layer – Original footage
2. Build the Faux High Pass: Select the High Pass layer and pre-compose it (Layer > Pre-compose). Name the pre-comp “High Pass” and check Open New Composition.
In the High Pass pre-comp, duplicate the footage twice. The bottom layer will remain as is. Set the Opacity of the top layer to 50%, then apply the following:
- Effect > Channel > Invert
- Effect > Box Blur. Set Iterations to about 3 and blur it until it starts to look like a High Pass filter was applied to it in Photoshop. Check Repeat Edge Pixels.
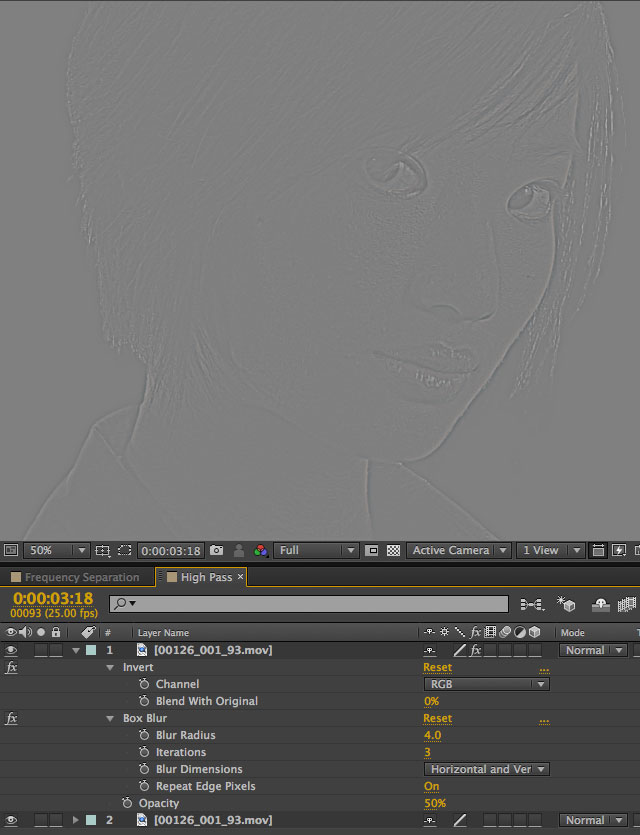
Close the High Pass comp and go back to the Frequency Separation Comp.
In the Frequency Separation Comp, set the Mode of the High Pass layer to Vivid Light. This should make the detail stick out even worse. to check the Video button (eyeball icon) in the Timeline to hide the High Pass layer. We’ll deal with that more a bit later.
3. Isolate the Skin or Problem Areas: We’ll want to isolate the problem areas or all of the skin, and we’ll use the appropriately named Skin Isolation layer for this task. There are a couple of ways to do this which will depend on your footage. See above: Isolating Skin Tones.
In this case, the over-sharpened skin is pretty consistent so I didn’t feel inclined to isolate just a small area. I decided to key the layer instead of using mocha, so I used the process above to Isolate Skin Tones with a Key.
After you have the layer keyed or masked, turn off the visibility by checking the Video button (eyeball icon) in the Timeline to hide the layer. We will come back to it.
4. Blur the Skin: Select the Blurred layer and apply Box Blur (Effect > Blur > Box Blur). Adjust Iterations and Blur Radius as you need. You won’t want to set the blur too high, just enough to blur the rough skin. I set Iterations to 3 and Blur Radius to 2.0. Check Repeat Edge Pixels so that you don’t blur the alpha channel or edge of the shot.
5. Adjust the Balance of Blur vs. Detail: Turn on the visibility of the High Pass layer then adjust the Opacity so that you can see the Blurred layer behind it but you still have detail from the High Pass. You’re focusing on the skin here. Other details such as the eyes, hair, and other areas may be blurred but that’s where the Skin Isolation layer comes into play.
6. Skin Isolation Layer to the Rescue: We could do this a couple of ways, but I prefer to select the High Pass and Blurred layer and Pre-compose them (Layer > Pre-compose). I called mine “High Pass Blur Comp”. In the Frequency Separation comp, set the TrkMat of High Pass Blur Comp to Luma Inverted Matte “Skin Isolation” if you used the Keylight method, or to Alpha “Skin Isolation” if you used mocha Shapes.
7. Adjust to your liking. I set it up to be very subtle, but you can kick up the blur or detail as you wish.
Speaking of Photoshop, need Photoshop Skin Retouching Tutorials?
The Ultimate Guide to the Dodge & Burn Technique is a great series that will really get into the nitty-gritty of Dodging and Burning. Julia Kuzmenko McKim published the series at Fstoppers and it’s great stuff!
- The Ultimate Guide to the Dodge & Burn Technique – Part 1: The Fundamentals
- The Ultimate Guide to the Dodge & Burn Technique – Part 2: Setting Up For A Good Start
- The Ultimate Guide to the Dodge & Burn Technique – Part 3: Curves Setup & More
How to Fix Common Skin and Hair Issues Using Texture Grafting
Michael Woloszynowicz talks about Texture Grafting which combines Dodging and Durning, Frequency Separation and more to take care of small details.
How to Even Out Rough Skin Texture and Pores in Photoshop
Michael Woloszynowicz is an expert in beauty photography and he shares another of his tricks.
I highly recommend that you check out more of Michael Woloszynowicz’s Youtube Channel and tutorials if you are doing any beauty photography.
And here are a bunch of other tutorials for you to enjoy.
- 9 Fantastic Tutorials on Skin Retouching in Photoshop – Light Stalking has a blog post that links to tutorials on changing skin tone, smoothing skin, retouching skin, airbrushing skin and more.
- Photoshop Tutorial: Retouching Shiny Skin – PetaPixel covers this common problem.
- 70 Beauty-Retouching Photoshop Tutorials – A huge list of tutorials covering skin, hair, body, teeth, eyes, and more.
And the Series Continues!
 In Depth: Skin Retouching Part 2: The Plug-ins
Check out Part 2: In Depth: Skin Retouching Part 2: The Plug-ins, covering plug-ins for general skin improvement, including:
- Digital Anarchy Beauty Box
- GenArts Sapphire S_Beauty
- FXHOME HitFilm Pro Skin Retouch
- Imagenomic Portraiture
- Dashwood Smooth Skin
- Red Giant Cosmo
- Red Giant Colorista II
 In Depth: Skin Retouching Part 3: More Plug-ins + Tutorials
Check out Part 3: In Depth: Skin Retouching Part 2: More Plug-ins + Tutorials, covering nine plug-ins for general skin improvement, including:
- CoreMelt SliceX Powered by mocha – FCPX
- CrumplePop SkinTone for FCPX
- Sheffield Softworks Makeup Artist
- PHYX Keyer SkinTools and Skin Light
- Boris Continuum Complete BCC Smooth Tone
- NewBlueFX Video Essentials IV Skin Touch Up
- RE:Vision Effects SmoothKit
- Plus, New Skin Retouching Tutorials
Posted by Michele


'%3e%3cg id='Final-Copy-2_2_' transform='translate(1275.000000, 200.000000)'%3e%3cpath class='st0' d='M7.4,12.8h6.8l3.1-11.6H7.4C4.2,1.2,1.6,3.8,1.6,7S4.2,12.8,7.4,12.8z'/%3e%3c/g%3e%3c/g%3e%3c/g%3e%3cg id='final---dec.11-2020'%3e%3cg id='_x30_208-our-toggle' transform='translate(-1275.000000, -200.000000)'%3e%3cg id='Final-Copy-2' transform='translate(1275.000000, 200.000000)'%3e%3cpath class='st1' d='M22.6,0H7.4c-3.9,0-7,3.1-7,7s3.1,7,7,7h15.2c3.9,0,7-3.1,7-7S26.4,0,22.6,0z M1.6,7c0-3.2,2.6-5.8,5.8-5.8 h9.9l-3.1,11.6H7.4C4.2,12.8,1.6,10.2,1.6,7z'/%3e%3cpath id='x' class='st2' d='M24.6,4c0.2,0.2,0.2,0.6,0,0.8l0,0L22.5,7l2.2,2.2c0.2,0.2,0.2,0.6,0,0.8c-0.2,0.2-0.6,0.2-0.8,0 l0,0l-2.2-2.2L19.5,10c-0.2,0.2-0.6,0.2-0.8,0c-0.2-0.2-0.2-0.6,0-0.8l0,0L20.8,7l-2.2-2.2c-0.2-0.2-0.2-0.6,0-0.8 c0.2-0.2,0.6-0.2,0.8,0l0,0l2.2,2.2L23.8,4C24,3.8,24.4,3.8,24.6,4z'/%3e%3cpath id='y' class='st3' d='M12.7,4.1c0.2,0.2,0.3,0.6,0.1,0.8l0,0L8.6,9.8C8.5,9.9,8.4,10,8.3,10c-0.2,0.1-0.5,0.1-0.7-0.1l0,0 L5.4,7.7c-0.2-0.2-0.2-0.6,0-0.8c0.2-0.2,0.6-0.2,0.8,0l0,0L8,8.6l3.8-4.5C12,3.9,12.4,3.9,12.7,4.1z'/%3e%3c/g%3e%3c/g%3e%3c/g%3e%3c/g%3e%3c/svg%3e) Your Privacy Choices Notice at Collection
Your Privacy Choices Notice at Collection