How to use 3rd Party Transition Plug-ins in Adobe Premiere Pro
Have you ever wondered why your third party transition plug-ins for Premiere Pro don’t show up under Video Transitions, like the native Transitions effects do?
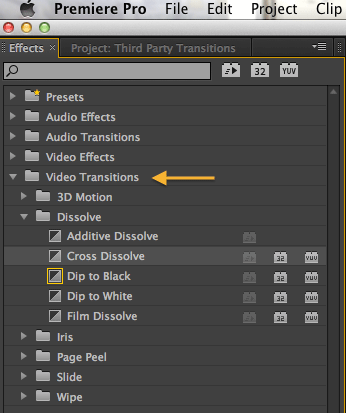
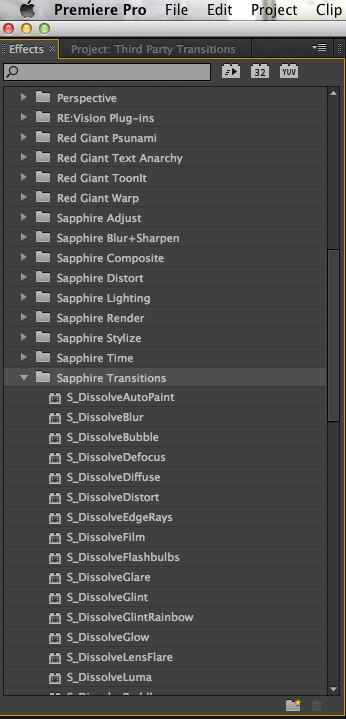
I am talking about Transitions from developers such as Boris FX, CoreMelt and GenArts. Their transition effects show up under Video Effects.
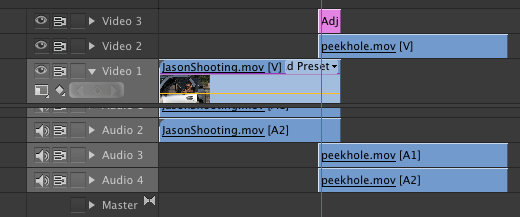
So, what’s the big deal? The problem is that they can’t be applied to a cut as a native Transition would be so having the effect work across a shot, blending the two pieces of footage isn’t as straight forward as it should be. There are all of these great third party Transitions available for Premiere Pro but how does one get them to work as a native transition? The image below shows how a native transition is applied.

I have a work around for you, using an Adjustment Layer. It’s not very elegant, but it works. Note, there may be other ways to do this. This is just the way I know. The added benefit is that you can copy and paste the Adjustment Layer with the effect and use it over and over again.
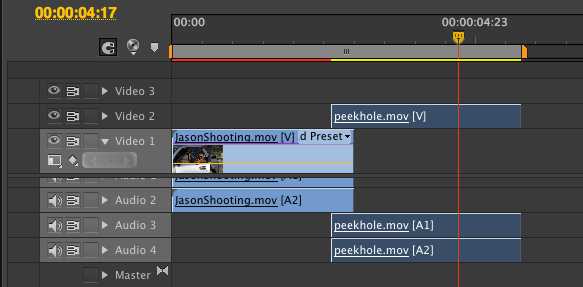
Here we have two clips that are cut together. I’m going to use GenArts Sapphire S_WipeClock. If the effect is applied to the first clip, the transition doesn’t blend across the two clips but abruptly ends at the end of the first clip. Now, you could apply it to both clips and keyframe the effect, but if you change any settings you’ll have to change the effect on both clips. That’s a pain.This won’t work.
Instead of butting them up together on the same layer, what I’ll do is put them on two separate layers and offset them for the duration of my transition. In other words, if I want my transition to be 15 frames long, I add 15 frames to the end of the first cut and to the beginning of the second.
Create a new Adjustment Layer. If you haven’t made an Adjustment Layer in Premiere Pro, it’s very different from After Effects. In the Project panel, go to the New Item icon at the bottom of the screen. It looks like a “New Document” icon. Click down on it and choose New Adjustment Layer from the pulldown menu.

A dialog box will pop up asking for the video settings. Set it up with the same settings as your video and then click OK.
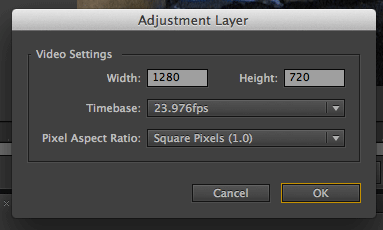
A new blank footage item will be added to the Project panel and it will black and named Adjustment layer.

Drag the Adjustment Layer to the layer above your cut, trim it to the duration of your transition and place it directly above your overlapped clips. Because I want a 15 frame transition, I’ll trim my Adjustment Layer to 15 frames.
Apply the transition to the Adjustment Layer. I applied GenArts Sapphire S_WipeClock. The GenArts plug-ins have an Auto Transition option, which is perfect for this because it will make the transition exactly as long as the Adjustment Layer. This is another reason why this is easier to apply the transition to an Adjustment layer. No key framing needed with this one. Each plug-in will be a bit different, of course. Some may not have an auto-animate option. If that’s the case, you will need to keyframe the transition percentage settings.
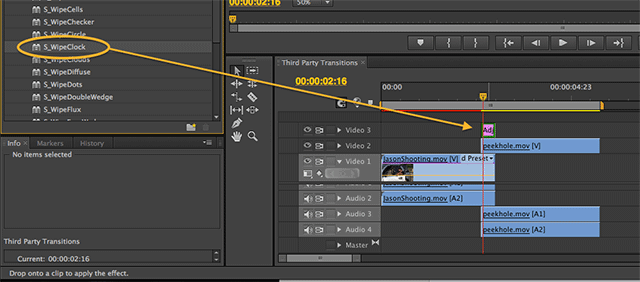
For the GenArts transitions, I set up Background to Video 1 and the Transition Dir to Wipe On from Background. I set Auto Trans to Yes: ignore Wipe%.

GenArts has the option to Save Preset right in the Effect Controls. Another option is to Save Preset in Premiere Pro. A third option is to just copy and paste the Adjustment layer in the timeline so it keeps the duration and all the settings. Use it over and over if you need to and speed up your workflow.
Posted by Alicia


'%3e%3cg id='Final-Copy-2_2_' transform='translate(1275.000000, 200.000000)'%3e%3cpath class='st0' d='M7.4,12.8h6.8l3.1-11.6H7.4C4.2,1.2,1.6,3.8,1.6,7S4.2,12.8,7.4,12.8z'/%3e%3c/g%3e%3c/g%3e%3c/g%3e%3cg id='final---dec.11-2020'%3e%3cg id='_x30_208-our-toggle' transform='translate(-1275.000000, -200.000000)'%3e%3cg id='Final-Copy-2' transform='translate(1275.000000, 200.000000)'%3e%3cpath class='st1' d='M22.6,0H7.4c-3.9,0-7,3.1-7,7s3.1,7,7,7h15.2c3.9,0,7-3.1,7-7S26.4,0,22.6,0z M1.6,7c0-3.2,2.6-5.8,5.8-5.8 h9.9l-3.1,11.6H7.4C4.2,12.8,1.6,10.2,1.6,7z'/%3e%3cpath id='x' class='st2' d='M24.6,4c0.2,0.2,0.2,0.6,0,0.8l0,0L22.5,7l2.2,2.2c0.2,0.2,0.2,0.6,0,0.8c-0.2,0.2-0.6,0.2-0.8,0 l0,0l-2.2-2.2L19.5,10c-0.2,0.2-0.6,0.2-0.8,0c-0.2-0.2-0.2-0.6,0-0.8l0,0L20.8,7l-2.2-2.2c-0.2-0.2-0.2-0.6,0-0.8 c0.2-0.2,0.6-0.2,0.8,0l0,0l2.2,2.2L23.8,4C24,3.8,24.4,3.8,24.6,4z'/%3e%3cpath id='y' class='st3' d='M12.7,4.1c0.2,0.2,0.3,0.6,0.1,0.8l0,0L8.6,9.8C8.5,9.9,8.4,10,8.3,10c-0.2,0.1-0.5,0.1-0.7-0.1l0,0 L5.4,7.7c-0.2-0.2-0.2-0.6,0-0.8c0.2-0.2,0.6-0.2,0.8,0l0,0L8,8.6l3.8-4.5C12,3.9,12.4,3.9,12.7,4.1z'/%3e%3c/g%3e%3c/g%3e%3c/g%3e%3c/g%3e%3c/svg%3e) Your Privacy Choices Notice at Collection
Your Privacy Choices Notice at Collection