In Depth: Noise/Grain Plug-ins for After Effects, Final Cut and Other NLEs, Part 1 of 2
Here is the rundown of noise and grain reduction plug-ins on the market for After Effects and other NLE’s, rated on speed, accuracy, and quality, as well as return on investment. This article will focus mostly on grain and noise reduction but also touch upon matching and adding grain and noise.

Table of contents
Plug-ins that will be covered in Part 2:
- CoreMelt C2 Gadget Editors Tools Noise Limiter
- GenArts Monsters GT M_RemGrain
- GenArts Sapphire S_Grain Remove
- Noise Industries FxFactory Noise Reduction
- PHYX Cleaner Fast Noise Reduction
- RE:Vision Effects De:Noise
- Red Giant Key Correct Denoiser
- Red Giant Magic Bullet Denoise
Introduction
In my book, Plug-in to After Effects: Third Party Plug-in Mastery, I did a big section in Chapter 14 on noise reduction plug-ins. This article is sort of an update, featuring new plug-ins, all new examples and more information.
A little clarification. In video, it’s referred to as noise, while in film it’s called grain. In film, sometimes grain sets the mood and gives it a gritty feel, but if you’re trying to match different stocks or you’re mixing film and video sources, you will likely need to remove and match some grain.
Where do noise and grain come from? In film, it’s naturally occurring. Noise is a big problem with footage shot in low light and DV footage.
There are two types of denoise filtering: spatial and temporal. Spatial filtering analyzes the footage frame by frame, using the whole frame. Temporal filtering will use the frames before and after to average noise. Temporal filtering tends to give motion artifacts and should be used very lightly.
Note: I created really nice examples and uploaded them to YouTube but what I found is that the compression of streaming video makes it extremely difficult to show noise reduction. You’ll have to deal with hovering over still images for this article.
Noise Reduction Tips
- Always use a light touch and do not use degrain or denoise plug-ins too heavily.
It is often better to leave some noise in your footage than to over process and lose detail in your shot. Just because you can denoise your footage doesn’t mean you should! - If you have the option to denoise per channel, that is the best option. If you take a look at the separate RGB channels, it’s highly likely that your blue channel has the most noise. Removing more noise on the blue channel (or wherever your noise may be) will help keep the detail in your footage.
- In After Effects you can view the full RGB and single channels at the time. To do this “use the pulldown menu at the top of the Composition panel and select New Comp Viewer. A new tab with the same video will open along the top of the Composition panel. Click to lock one of them and drag the other to the left side of the Composition panel, until the side of the window highlights. Let it go and you should see two videos side by side. Command+Option+Shift+N will split the panel in one click!” You can do this with all 3 color channels and RGB as well. This hot tip is an excerpt from Plug-in to After Effects.
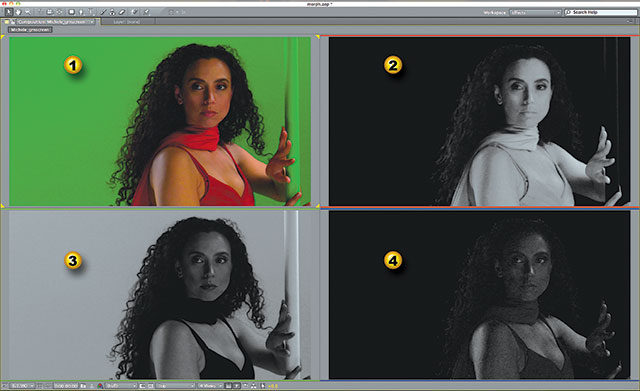
The noise per channel is obvious when each channel is shown side by side in a quadrant. 1. RGB, 2. The red channel, 3. Green channel. 4. Blue channel. (Footage credit: Angie Mistretta/Toolfarm – Professional Keying with Keylight from Toolfarm Expert Series). Also used in Plug-in to After Effects, Ch. 14.)
- Sampling areas for degraining. If your plug-in allows for choosing your own sampling, like the After Effects Remove Grain plug-in and Cinnafilm Dark Energy Anti-Matter, choose an area that doesn’t have texture. For example, if you have a shot of the clear sky, the ocean and sand, you would want to sample noise from the sky, where the color is as even as possible. If you take a sample from an area with texture, like sand or moving water, the filters will reproduce that texture.
- Denoise before applying a keyer and tracking footage. You will have an easier time getting a clean key and tracking footage.
- For matching grain, it is often best to degrain all footage then add grain on all cleaned footage so that all footage matches.
- Why would you want to add grain? When combining footage from different sources, such as compositing with photos or computer-generated elements, these elements tend to be much cleaner than video. By matching the grain color, size, and structure, your composites will look more natural. Another user of adding grain is to give the video a more filmic feel.
Noise/Grain Plug-ins & Samples
After Effects Remove Grain, Add Grain, Match Grain
Believe it or not, the plug-in that ships with After Effects is one of my favorites because it has the option of per channel degraining. The three plug-ins were acquired by Adobe from Grain Surgery in 2006. The plug-ins are very robust but they do tend to be a bit processor intensive, hence the little preview window. They can sample areas of the video and work per channel and give you a fine level of control. Sampling the video properly will make or break your grain removal, so choose wisely (see note above). The Match Grain and Add Grain settings are very similar to Remove Grain.
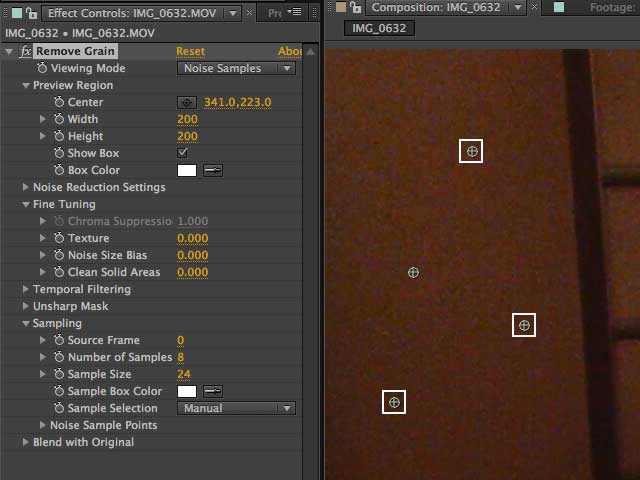
This is the After Effects Remove Grain interface with Sampling set to Manual. Choose a flat area with no texture when you sample for best results.

Hover over the image above to see a before and after of the effect. The noise is mainly a problem in the smooth areas in the sky. The idea is to remove noise but keep the features of his face nice and sharp. It is a definite improvement.
Overall: The big downside of After Effects Remove Grain plug-in is speed. It’s bloody slow! If you have no budget for something like ABSoft Neat Video Pro, or just need a quick fix, use it. If you have tons of video to denoise, you will definitely want something that runs faster, especially if you’re working on a slower machine or a laptop. On the upside, if you own AE, you already have this filter.
ABSoft Neat Video Pro
Toolfarm Price: $94.90, MSRP: $99.90. Download Demo
Host Support:
- Adobe After Effects
- Adobe Premiere Pro and Premiere Elements
- Apple Final Cut Pro and FCP X and Final Cut Express
- Apple Motion
- OFX (Nuke, Fusion, DustBuster, Scratch)
- VirtualDub
- Sony Vegas Pro and Sony Vegas Movie Studio
- Pinnacle Studio
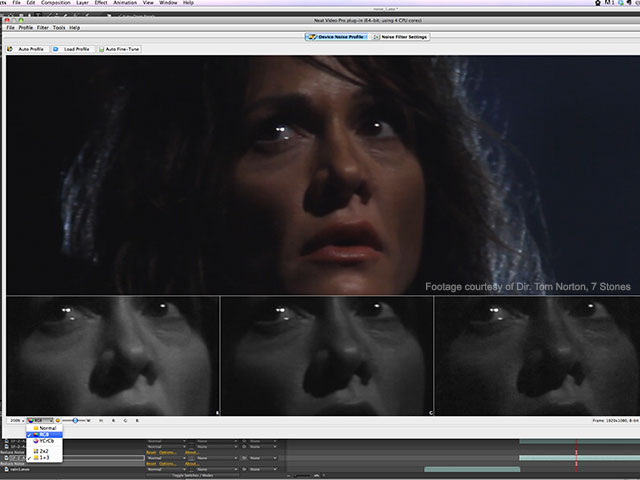
“Neat Video is a video filter designed to reduce visible noise and grain in digital video footage produced by digital video cameras, camcorders, TV-tuners, digitizers of film or analog video.” The thing with Neat Video is that it works in so many hosts. The effect will work in 8-bit, 16-bit and 32-bit float color space in AE and it works very fast.

Hover over the image above to see a before and after Neat Video Pro at work. It handles very fine grain really well, without blurring the detail. It’s an impressive tool
With Neat Video Pro, there doesn’t look like there’s anything going on in the Effect Controls panel in After Effects. There are very few options and when you apply it, nothing happens. The trick is to click the Options link. and it will open a full interface. At the top center of the interface, it will default to the Device Noise Profile, where you profile the noise as the first step. At the top of the interface, you have 3 options: Auto Profile, Load Profile, and Auto Fine-Tune. If you don’t have a profile set up, you can click Auto Profile and it does it for you. After clicking Auto Profile, the frame will be sampled for noise. You may be asked to choose a larger sample. Look for an area that is solid without any texture.
What’s cool about the interface is in the lower left corner there’s a pulldown menu that lets users view per channel, lighten or darken the preview to see more grain and zoom in. There doesn’t seem to be a way to move the area that it zooms into but it’s still a great feature.
The Device Noise Profile settings in the Neat Video Pro settings on some other footage.
Clicking on Noise Filter Settings on the top center will bring up options on the right-hand side of the page. There are several presets, which is really nice, and an option to choose advanced settings. Once you choose Advanced Filter Settings a control panel appears with several sliders for reducing High Mid and Low noise amounts as well as Y Cr B noise, and options to sharpen.
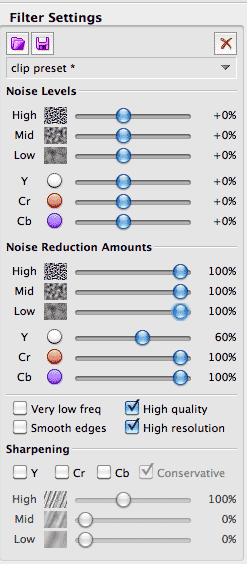
Neat Video Pro’s Advanced Settings
Once you’re happy with the settings, click Apply.
Hot tip! To toggle the effect on and off while you’re in the Neat Video plug-in interface, click on the Noise Filter Settings tab on the top center and then click the Preview button on the top left.
Note: When you install the plug-in, it goes into Applications > Neat Video for After Effects > (plug-in), which requires you to either choose the plug-ins folder during install or move it to the right folder afterward. I only checked with AE on the Mac but it’s likely that this is something that will occur with any installation.
Overall: This is my favorite of the noise reduction tools. It’s solid, powerful and a total bargain at just $99. The features in the interface such as showing the RGB channels are very cool but the quality of the noise removal is top notch. Everyone should have this tool in their toolbox!
Boris Continuum Complete BCC Noise Reduction
Host support:
- Adobe After Effects
- Adobe Premiere Pro
- Apple Final Cut Pro
- Apple Motion
- Avid Media Composer
- Avid NewsCutter
- Avid Symphony
- Avid DS
- Sony Vegas Pro
As you probably know from other articles I have written, I love the Boris Continuum Complete package because of the amount of creative control and vast options available to users. BCC Noise Reduction is a robust temporal and Spatial noise reduction plug-in. It works by blending pixels that are closest in proximity and are similarly colored and ignoring pixels that are not so close in look so that it will keep the detail. It works in YCrCb color space, just as Neat Video Pro The filter works in 8-bit and 16-bit, which will, of course, give better results.

Hover over image to see the original footage without the plug-in applied. The footage has been zoomed to 200% so that you can see the detail.
A couple of cool features of the BCC Noise Reduction filter is the built-in Motion Tracker and PixelChooser, which allows you to isolate certain areas of the frame. This can be extremely useful when the noise is showing up in the brighter areas only, a dark corner of the footage or some other place.
Note: BCC DeGrain is the former name of the Noise Reduction plug-in in older versions of BCC. It was a temporal noise reduction tool and the new one is vastly better. BCC DeGrain now listed under obsolete but it still there and it works, just in case you have old projects to open.
Boris Continuum BCC Match Grain is also worth mentioning here. Like BCC DeGrain, users select a noise sample from another layer, frame, and section of that frame. There are adjustments for grain size and contrast. Pixel Chooser is built-into the filter and gives even more control over isolating the area in which the grain is added.
Overall: BCC Noise Reduction has tons of options and the built-in Motion Tracker and Pixel Chooser are one of a kind features. It is not my favorite noise reduction tool in this review, but it can definitely improve grainy footage.
In Depth: Noise/Grain Plug-ins for After Effects, Final Cut and Other NLEs, Part 2
Check out In Depth: Noise/Grain Plug-ins for After Effects, Final Cut and Other NLEs, Part 2, which will be out next Friday, January 11, 2013. Plug-ins that will be covered in Part 2:
- CoreMelt C2 Gadget Editors Tools Noise Limiter
- GenArts Monsters GT M_RemGrain
- GenArts Sapphire S_Grain Remove
- Noise Industries FxFactory Noise Reduction
- PHYX Cleaner Fast Noise Reduction
- RE:Vision Effects De:Noise
- Red Giant Key Correct Denoiser
- Red Giant Magic Bullet Denoiser
- Tiffen Dfx DeNoise
Posted by Michele


'%3e%3cg id='Final-Copy-2_2_' transform='translate(1275.000000, 200.000000)'%3e%3cpath class='st0' d='M7.4,12.8h6.8l3.1-11.6H7.4C4.2,1.2,1.6,3.8,1.6,7S4.2,12.8,7.4,12.8z'/%3e%3c/g%3e%3c/g%3e%3c/g%3e%3cg id='final---dec.11-2020'%3e%3cg id='_x30_208-our-toggle' transform='translate(-1275.000000, -200.000000)'%3e%3cg id='Final-Copy-2' transform='translate(1275.000000, 200.000000)'%3e%3cpath class='st1' d='M22.6,0H7.4c-3.9,0-7,3.1-7,7s3.1,7,7,7h15.2c3.9,0,7-3.1,7-7S26.4,0,22.6,0z M1.6,7c0-3.2,2.6-5.8,5.8-5.8 h9.9l-3.1,11.6H7.4C4.2,12.8,1.6,10.2,1.6,7z'/%3e%3cpath id='x' class='st2' d='M24.6,4c0.2,0.2,0.2,0.6,0,0.8l0,0L22.5,7l2.2,2.2c0.2,0.2,0.2,0.6,0,0.8c-0.2,0.2-0.6,0.2-0.8,0 l0,0l-2.2-2.2L19.5,10c-0.2,0.2-0.6,0.2-0.8,0c-0.2-0.2-0.2-0.6,0-0.8l0,0L20.8,7l-2.2-2.2c-0.2-0.2-0.2-0.6,0-0.8 c0.2-0.2,0.6-0.2,0.8,0l0,0l2.2,2.2L23.8,4C24,3.8,24.4,3.8,24.6,4z'/%3e%3cpath id='y' class='st3' d='M12.7,4.1c0.2,0.2,0.3,0.6,0.1,0.8l0,0L8.6,9.8C8.5,9.9,8.4,10,8.3,10c-0.2,0.1-0.5,0.1-0.7-0.1l0,0 L5.4,7.7c-0.2-0.2-0.2-0.6,0-0.8c0.2-0.2,0.6-0.2,0.8,0l0,0L8,8.6l3.8-4.5C12,3.9,12.4,3.9,12.7,4.1z'/%3e%3c/g%3e%3c/g%3e%3c/g%3e%3c/g%3e%3c/svg%3e) Your Privacy Choices Notice at Collection
Your Privacy Choices Notice at Collection