Getting Washed Out Color from Resolve on Mac? Here’s the Fix
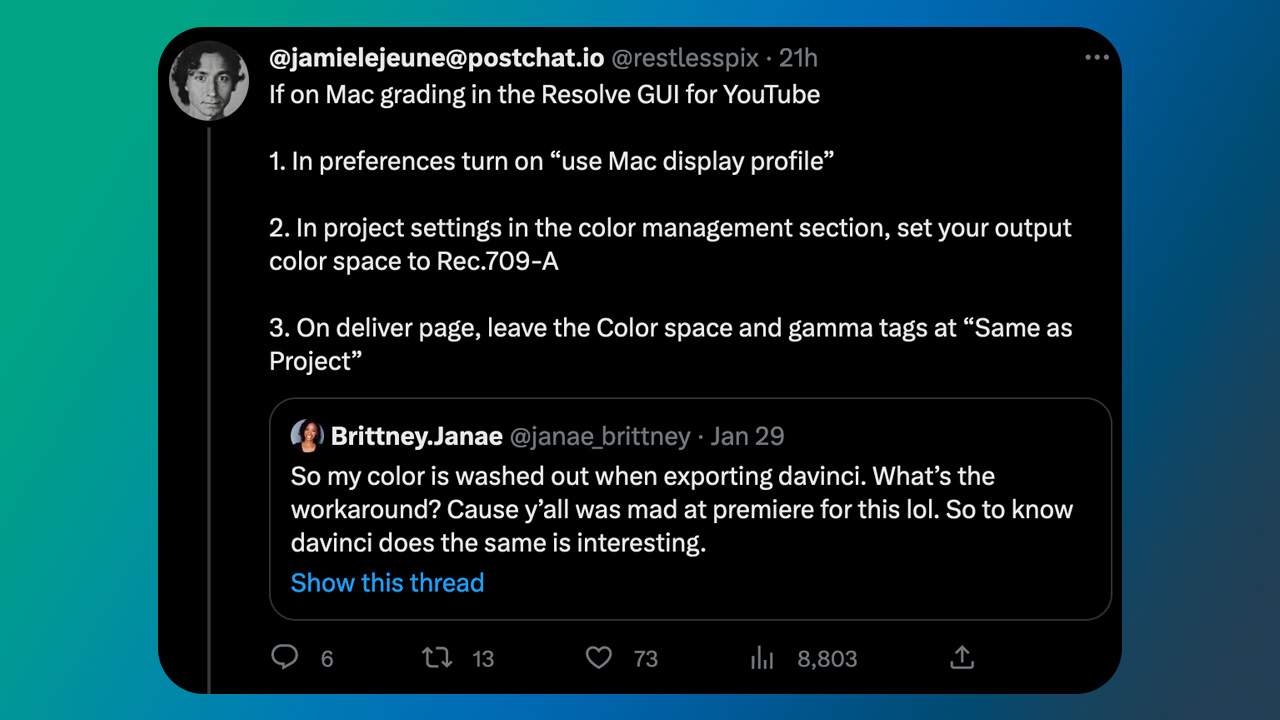
Twitter serves up a variety of content – today, it’s all about color grading success! @jamielejeune@postchat.io jumped in to answer a question regarding how to get ideal colors for YouTube uploads using DaVinci Resolve and one key factor: Rec.709-A color space (which we’ll explain more!). So if you’re wondering about getting your color just right, take note of this Twitter thread. It could be your guide toward perfect hues on YouTube!
In addition, Jamie included some screenshots in the thread, which I’ve included below.


After you set these preferences, restart Resolve Studio.
Let’s Dive into these settings
The tweet above is extremely helpful for a proper color setup, however, there is a lot to unpack here. I’m not a colorist by any means, but I dabble. T
What does “10-bit Precision in Viewers if Available” mean?
Bit Depth or Color Depth is the number of bits on the red, green, and blue channels in an RGB image. More bpc delivers more color combinations and accuracy.
10-bit allows for a much more colorful experience, with 1024 per channel, or 11.07 Billion Colors. 8-bit provides a maximum of 256 shades each of red, green, and blue, or 16.7 Million Colors. Now, that sounds like a lot, but you will likely see banding in gradients in 8 bpc, while in 10-bit your gradients will look smooth. By using 8-bit color, you are missing out on a lot of image quality.
Further reading: Why you should have a calibrated 10-Bit monitor for Color Grading from Bounce Color.
Use Mac Display Color Profiles for Viewers
This preference was created because Apple computers and monitors have their own color management system that deals with colors in their own particular way. While it’s a great system, it doesn’t always work well out of the box with some software.
With this setting properly set, editors can avoid a color shift that Mac users often see when outputting footage.
The video below explains how to set up your color Management Settings in Resolve if you’re on Mac.
Avoid Gamma Shift from DaVinci Resolve to YouTube
Creative Video Tips gets into the nitty-gritty of the settings talked about above and is a great resource for anyone who uses Resolve for videos exporting videos for YouTube.
Further reading: Matching Color: DaVinci Resolve’s Viewer & Mac P3 Displays and Applications (for macOS High Sierra) from The Post Process
What is Rec.709?
Created in 1990 by ITU-R, the International Telecommunication Union, Rec.709 is an industry-standard color gamut for high-definition TVs and image encoding. You may also see it called BT.709 or ITU 709.
Below, Waqas Qasi, a professional colorist, explains Rec.709 clearly in the video. In layman’s terms, he explains Rec.709 as “a common language between your camera and your display” to show what our cameras have captured. Watch the video for a deeper understanding of how the LOG to Rec.709 conversion works.
From Brittney.Janae’s description in her tweet, she is seeing her footage output in LOG Color space, which is flat looking. Rec.709 will give editors the best-looking results for exporting to YouTube.
For a deep dive into LOG, RAW, and Rec.709, see: Difference Between RAW, LOG, and Rec 709 Camera Footage
DaVinci Resolve Wide Gamut vs. Rec.709
DaVinci Resolve’s Wide Gamut Intermediate, introduced in 2020, includes the Wide Gamut color space (DWG) and DaVinci Intermediate OETF (DI) for encoding log-based footage. Resolve’s Wide Gamut includes more colors than Rec.709 and other formats, so you get better color and more control. The problem is that current displays are designed for Rec.709, not DWG. Standards change, though, and devices in the future will most definitely have wider color displays. The recommended workflow is to work in DaVinci Wide Gamut to future-proof your projects, but export with Rec.709 to support current devices.
Recommended reading: Gamma, Gamut, Levels, and Best Practices for Approaching Color Management With DaVinci Resolve and DaVinci Resolve Studio from Fstoppers
The chart below gives you a good idea of how much larger the color space is in Resolve’s Wide Gamut.

Popular Tools for Color Grading in DaVinci Resolve
Indeed. DaVinci Resolve has incredible built-in tools. That said, the tools below will speed up your workflow and make the job more intuitive.
timeinpixels Nobe Display
Additional Display Tool for DaVinci Resolve
Nobe Display mirrors the preview in DaVinci Resolve and allows you to place it anywhere on your desktop. It enables you to have a picture preview on the external monitor without using extra hardware.
Read about How to use Nobe Display with Color Managed timeline in DaVinci Resolve.
Intuitive color grading tools, designed for your camera
CineMatch for DaVinci Resolve is a fast, easy color grading solution for all filmmakers. Match footage from over 70 camera makes and models. Use RAW-like controls to correct your footage. Apply REC.709 transforms with a single click.
For beginner filmmakers, expert color graders and everyone in between – grade your projects faster and easier using FilmConvert’s unique Sensor Matching technology.
Posted by Michele


'%3e%3cg id='Final-Copy-2_2_' transform='translate(1275.000000, 200.000000)'%3e%3cpath class='st0' d='M7.4,12.8h6.8l3.1-11.6H7.4C4.2,1.2,1.6,3.8,1.6,7S4.2,12.8,7.4,12.8z'/%3e%3c/g%3e%3c/g%3e%3c/g%3e%3cg id='final---dec.11-2020'%3e%3cg id='_x30_208-our-toggle' transform='translate(-1275.000000, -200.000000)'%3e%3cg id='Final-Copy-2' transform='translate(1275.000000, 200.000000)'%3e%3cpath class='st1' d='M22.6,0H7.4c-3.9,0-7,3.1-7,7s3.1,7,7,7h15.2c3.9,0,7-3.1,7-7S26.4,0,22.6,0z M1.6,7c0-3.2,2.6-5.8,5.8-5.8 h9.9l-3.1,11.6H7.4C4.2,12.8,1.6,10.2,1.6,7z'/%3e%3cpath id='x' class='st2' d='M24.6,4c0.2,0.2,0.2,0.6,0,0.8l0,0L22.5,7l2.2,2.2c0.2,0.2,0.2,0.6,0,0.8c-0.2,0.2-0.6,0.2-0.8,0 l0,0l-2.2-2.2L19.5,10c-0.2,0.2-0.6,0.2-0.8,0c-0.2-0.2-0.2-0.6,0-0.8l0,0L20.8,7l-2.2-2.2c-0.2-0.2-0.2-0.6,0-0.8 c0.2-0.2,0.6-0.2,0.8,0l0,0l2.2,2.2L23.8,4C24,3.8,24.4,3.8,24.6,4z'/%3e%3cpath id='y' class='st3' d='M12.7,4.1c0.2,0.2,0.3,0.6,0.1,0.8l0,0L8.6,9.8C8.5,9.9,8.4,10,8.3,10c-0.2,0.1-0.5,0.1-0.7-0.1l0,0 L5.4,7.7c-0.2-0.2-0.2-0.6,0-0.8c0.2-0.2,0.6-0.2,0.8,0l0,0L8,8.6l3.8-4.5C12,3.9,12.4,3.9,12.7,4.1z'/%3e%3c/g%3e%3c/g%3e%3c/g%3e%3c/g%3e%3c/svg%3e) Your Privacy Choices Notice at Collection
Your Privacy Choices Notice at Collection