All Tutorials (3073 Tutorials)
In Depth: Noise/Grain Plug-ins for After Effects, Final Cut and Other NLEs, Part 1 of 2
January 3, 2013
Here’s the rundown of noise and grain reduction plug-ins on the market for After Effects and other NLE’s, rated on speed, accuracy and quality, as well as return on investment. This article will focus mostly on grain and noise reduction but also touch upon matching and adding grain and noise.
Create a Shattering Glass Animation in Cinema 4D & AE – Part 3 Rendering
December 27, 2012
Post at CGtuts+: “Today’s lesson is all about prepping for rendering. You’ll start by finalizing the animation with some slight tweaks to the timing. Once done you’ll move onto the material setup and learn how to create realistic glass and metal shaders using Cinema 4D’s intuitive material editor. Finally, Cyril will walk you through lighting the scene. This lesson includes building a dynamic light rig using XPresso and fine tuning it’s position to generate correct caustics at render time.”
Create a Shattering Glass Animation in Cinema 4D & AE – Part 2 Cameras & Pre-Viz
December 27, 2012
Post at CGtuts+: “In part two you’ll get an in-depth lesson on how real-world cameras work. Cyril provides detailed insight on working with focal length, aperture, depth of field and motion blur and how these principles and settings apply to your Cg cameras. Then it’s back to Cinema 4D where you’ll learn how to block out shot timing, and find the best camera positions for the animation by running through a detailed pre-visualization process.”
Create a Shattering Glass Animation in Cinema 4D & AE – Part 1 Modeling & Animation
December 27, 2012
Post at CGtuts+: “Create a cool slow-motion shattering glass animation using Cinema 4D and After Effects. Over the course of this massive lecture, professional artist Cyril Kotecky will teach you the ins and outs of working with dynamics and what goes into creating such a shot. Including the benefits Pre-Viz can have in the early stages as you block out your shot timing and camera positions.”

Tempo: Up in Flames – Realistic & Slow-Motion Fire Effects
December 18, 2012
In this episode of Red Giant TV, Aharon Rabinowitz walks you through the workflow used to create realistic fire for the film Tempo. He’ll be using a combination of real fire footage, Trapcode Particular, and some 3rd Party plug-ins from RE:Vision Effects.
NewBlueFX Titler Pro 2 Lighting and Wide Angle
December 18, 2012
In this tutorial, Ian Stark shows you how to perfect lighting and wide angle titles with the simplicity and versatility of Titler Pro 2.0.
ZBrush Digital Sculpting, Military Character Assets with Joseph Drust
December 14, 2012
Pixelogic has a tutorials area called ZClassroom and they have a series of Military Character Assets with Joseph Drust, a video game industry veteran who focuses on modeling and sculpting. Below are is a link to all of their tutorials in the series, with more coming soon.
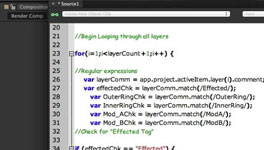
Tutorial: Introduction to After Effects Scripting
December 13, 2012
Dylan Winter explains the basics of scripting in After Effects. “Unlike expressions, scripts operate from the application level and are not locked down the a single parameter. They can be used to affect multiple properties of multiple layer simultaneously, as in this lesson where we'll increment through layers and rename them according to their indexes.”
Create Cinema 4D Style Effectors in After Effects/ Dylan Winter
December 11, 2012
Dylan Winter demonstrates how you can expand After Effects towards the premise of Effectors in Cinema 4D. “If you ever wished that you could take advantage of some of Cinema 4D’s powerful effector tools while working in After Effects, your wish may now be granted. Using some clever scripting and a basic control system, we’re going to rig up our very own effectors within After Effects”.
Using Advanced fractures with Pulldownit in MAYA
November 26, 2012
Showing how to control the way an object fractures with pulldownit plugin in MAYA.
New Keyframe Look For Maxon CINEMA R14: What Are Those New Triangle Icons?
November 21, 2012
Nick Campbell at Greyscalegorilla talks about the new triangle keyframe things in Maxon CINEMA 4D R14.
Create Cool Lighting Effects in Avid with BCC Lens Flare 3D
November 21, 2012
Using Boris Continuum Complete’s powerful Lens Flare 3D filter, Kevin P. McAuliffe shows you how to set up lighting effects in your favorite Avid video editing system. First, Kevin demonstrates how to create multiple lights that blink automatically. Then, he combines BCC Extruded Text with BCC Lens Flare 3D to create a starting title sequence.
Imagineer mocha AE 3.1 and mocha Pro 3.1 Lens Distortion Tips, Calibration Clips, Using Grids
November 15, 2012
Martin Brennand takes you through how to calibrate a lens with the mocha Lens Module and use it with the new mocha Lens plug-in supported with mocha AE 3.1 and mocha Pro 3.1 – Also covered- using a calibration clip when you do not have enough information in your shot to define the warp of the lens.
Coremelt Slice X for Final Cut Pro X
November 15, 2012
“…now that I have you interested let me really explain Slice X. Unlike a lot of the other masking tools for Final Cut Pro X, Slice X does not limit you to the amount of points for the mask, it also doesn’t force extra points on you. The default mask in Final Cut Pro X, only has 4 points. The one from Ripple Training is an 8-point Garbage Matte. There are others with 10-points, 20-points, or 30-points, but what if you needed say 11 or 13 points, or maybe 5 points. You would be stuck using one that had more points than you needed or trying to make due with a matte that had too few points. “
Avid Media Composer 6.5 ‒ Product Designer Series on Advanced Audio Keyframes
October 22, 2012
A new feature on manipulating audio keyframes using Volume control in Avid Media Composer 6.5
'%3e%3cg id='Final-Copy-2_2_' transform='translate(1275.000000, 200.000000)'%3e%3cpath class='st0' d='M7.4,12.8h6.8l3.1-11.6H7.4C4.2,1.2,1.6,3.8,1.6,7S4.2,12.8,7.4,12.8z'/%3e%3c/g%3e%3c/g%3e%3c/g%3e%3cg id='final---dec.11-2020'%3e%3cg id='_x30_208-our-toggle' transform='translate(-1275.000000, -200.000000)'%3e%3cg id='Final-Copy-2' transform='translate(1275.000000, 200.000000)'%3e%3cpath class='st1' d='M22.6,0H7.4c-3.9,0-7,3.1-7,7s3.1,7,7,7h15.2c3.9,0,7-3.1,7-7S26.4,0,22.6,0z M1.6,7c0-3.2,2.6-5.8,5.8-5.8 h9.9l-3.1,11.6H7.4C4.2,12.8,1.6,10.2,1.6,7z'/%3e%3cpath id='x' class='st2' d='M24.6,4c0.2,0.2,0.2,0.6,0,0.8l0,0L22.5,7l2.2,2.2c0.2,0.2,0.2,0.6,0,0.8c-0.2,0.2-0.6,0.2-0.8,0 l0,0l-2.2-2.2L19.5,10c-0.2,0.2-0.6,0.2-0.8,0c-0.2-0.2-0.2-0.6,0-0.8l0,0L20.8,7l-2.2-2.2c-0.2-0.2-0.2-0.6,0-0.8 c0.2-0.2,0.6-0.2,0.8,0l0,0l2.2,2.2L23.8,4C24,3.8,24.4,3.8,24.6,4z'/%3e%3cpath id='y' class='st3' d='M12.7,4.1c0.2,0.2,0.3,0.6,0.1,0.8l0,0L8.6,9.8C8.5,9.9,8.4,10,8.3,10c-0.2,0.1-0.5,0.1-0.7-0.1l0,0 L5.4,7.7c-0.2-0.2-0.2-0.6,0-0.8c0.2-0.2,0.6-0.2,0.8,0l0,0L8,8.6l3.8-4.5C12,3.9,12.4,3.9,12.7,4.1z'/%3e%3c/g%3e%3c/g%3e%3c/g%3e%3c/g%3e%3c/svg%3e) Your Privacy Choices
Your Privacy Choices