All Tutorials (3073 Tutorials)
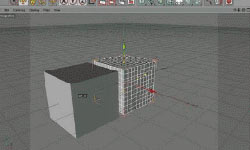
Model, Light And Animate A Pin Sculpture In Cinema 4D
February 18, 2013
Post by Chris Schmidt at Greyscalegorilla: “In this two part tutorial, we show you how to model, rig, animate, light and render this Pin Sculpture Toy in Cinema 4D. Follow along as Chris shows you how to build the model and set up the Mograph and Shader Effectors to drive the pins using a depth pass. Then, in part 2, I will show you how to animate the pins using a video depth pass. Finally, we will light, texture, and render the sculpture for output to your compositing program.”

Create a Valentine’s Day Themed Animation in Cinema 4D & After Effects
February 14, 2013
Post by Stefan Surmabojov at CGtuts+ : “In this tutorial we are going to create a Valentine’s Day themed animation in Cinema 4D and After Effects…. Use particles and forces in Cinema 4D, as well as MoDynamics and Effectors to put everything together to create our final animation. Finally we’ll add materials, light and render the scene before finishing it up in After Effects with some compositing and post effects.”
Cinema 4D Scene OBJ Export to Trapcode Form
February 12, 2013
Posted by Peder Norrby. Tutorial showing how to create a scene in Cinema 4D and export an OBJ and Cinema’s camera. And import all this in Adobe After Effects so the Cinema render perfectly matches Trapcode Form.

Disintigration and Reintigration in Maxon Cinema 4D
February 12, 2013
Post by Rob Redman/ Pariah Studios. How to destroy object in Cinema 4D without plug-ins or external tools.
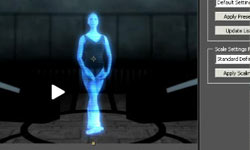
Red Giant Holomatrix- Create a Holographic Look in After Effects
February 12, 2013
In this episode, Aharon Rabinowitz shows you how to create the look of a holographic interface, using Red Giant Software’s Holomatrix. He’ll also use Magic Bullet Looks for color grading, and footage from Digital Juice’s Motion Designer’s Toolkit.
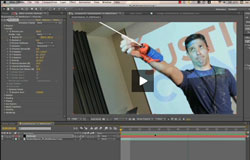
Web Line Escape: Spider-Man Web-Slinging Effect
February 12, 2013
In this episode of Red Giant TV, director Seth Worley shows you how to create a Spider-Man Web Slinging Effect with Trapcode Particular.

Element 3D: Beyond Basics; Importing Objects & Building Materials, Extruding Masks & Text
February 12, 2013
New Video Copilot Element 3D Tutorials: Beyond the Basics: Everything you need to know to get started! Importing Objects & Building Materials: C4D tips, OBJ exporting and more!
Introduction to Trapcode Mir, Getting Started Parts 1 & 2
February 12, 2013
Check out these new tutorials on Trapcode Mir at Red Giant TV. Quick Walkthrough Introduction to Mir, and Getting Started Parts 1 & 2 by Peder Norrby of Trapcode. Trapcode Mir was released today, along with the new Trapcode Suite 12.
How to use 3rd Party Transition Plug-ins in Adobe Premiere Pro
February 12, 2013
Have you ever wondered why your third party transition plug-ins for Premiere Pro don’t show up under Video Transitions, like the native Transitions effects do? I have a work around for you, using an Adjustment Layer.
CoreMelt SliceX Now with Shape Keyframing
February 4, 2013
SliceX lets you create instant Shape Masks to cut out layers or isolate effects directly in Final Cut Pro X without having to go into Motion or create the masks with an external program. SliceX includes nine motion templates for common tasks and you can also use the Shape Masks with built in effects, the built in color corrector or with third party plugins. In the latest free update you can now keyframe animate the shapes as well as the shapes position, rotation and scaling.
In Depth: Motion Stabilization Options, Part 2 of 2
January 31, 2013
Sometimes using a tripod is not an option and you’re forced to shoot hand-held. Maybe you’re shooting in an amusement park, botanical gardens, or a concert and tripods are not allowed in. Unless you have the ability to stand perfectly still, you will likely need to stabilize the footage in postproduction. Motion stabilization is used to smooth footage and remove camera shake.

How to Automate a Stop Motion Photo Slideshow in After Effects
January 25, 2013
By Emanuele Fiorito at AEtuts+: “In this tutorial we will see how to work some expressions to create your own preset that you can apply to achieve a stop motion effect for hundreds of photos.”

Use Video Copilot Metropolitan with Element 3D to Create a Realistic City Title
January 24, 2013
By Andrew Kramer/ Video Copilot: Use the new Metropolitan with Element 3D to create a realistic city title, Use Randomize Angle feature to distribute buildings into the scene
In Depth: Noise and Grain Plug-ins for After Effects, Final Cut and Other NLEs, Part 2 of 2
January 10, 2013
Here is the rundown of noise and grain reduction plug-ins on the market for After Effects and other NLE’s, rated on speed, accuracy and quality, and ROI.
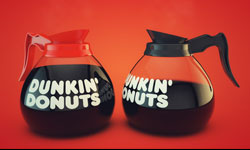
Model, Light, And Render A Coffee Pot In Cinema 4D
January 8, 2013
Post by Nick Campbell/ Greyscalegorilla: “In this two part tutorial, Chris and I show you how to model, texture, light, render, and composite this 3D Scene. First, Chris will show you how to model the coffee pot using some traditional modeling techniques and loft nurbs. In the second video below, I will take over where chris left and show you how to light the scene using HDRI Studio Pack. Then I will tweak some textures and render using the Physical Renderer. Finally, we will head in to Photoshop and do a bit of final color correction and compositing.”
'%3e%3cg id='Final-Copy-2_2_' transform='translate(1275.000000, 200.000000)'%3e%3cpath class='st0' d='M7.4,12.8h6.8l3.1-11.6H7.4C4.2,1.2,1.6,3.8,1.6,7S4.2,12.8,7.4,12.8z'/%3e%3c/g%3e%3c/g%3e%3c/g%3e%3cg id='final---dec.11-2020'%3e%3cg id='_x30_208-our-toggle' transform='translate(-1275.000000, -200.000000)'%3e%3cg id='Final-Copy-2' transform='translate(1275.000000, 200.000000)'%3e%3cpath class='st1' d='M22.6,0H7.4c-3.9,0-7,3.1-7,7s3.1,7,7,7h15.2c3.9,0,7-3.1,7-7S26.4,0,22.6,0z M1.6,7c0-3.2,2.6-5.8,5.8-5.8 h9.9l-3.1,11.6H7.4C4.2,12.8,1.6,10.2,1.6,7z'/%3e%3cpath id='x' class='st2' d='M24.6,4c0.2,0.2,0.2,0.6,0,0.8l0,0L22.5,7l2.2,2.2c0.2,0.2,0.2,0.6,0,0.8c-0.2,0.2-0.6,0.2-0.8,0 l0,0l-2.2-2.2L19.5,10c-0.2,0.2-0.6,0.2-0.8,0c-0.2-0.2-0.2-0.6,0-0.8l0,0L20.8,7l-2.2-2.2c-0.2-0.2-0.2-0.6,0-0.8 c0.2-0.2,0.6-0.2,0.8,0l0,0l2.2,2.2L23.8,4C24,3.8,24.4,3.8,24.6,4z'/%3e%3cpath id='y' class='st3' d='M12.7,4.1c0.2,0.2,0.3,0.6,0.1,0.8l0,0L8.6,9.8C8.5,9.9,8.4,10,8.3,10c-0.2,0.1-0.5,0.1-0.7-0.1l0,0 L5.4,7.7c-0.2-0.2-0.2-0.6,0-0.8c0.2-0.2,0.6-0.2,0.8,0l0,0L8,8.6l3.8-4.5C12,3.9,12.4,3.9,12.7,4.1z'/%3e%3c/g%3e%3c/g%3e%3c/g%3e%3c/g%3e%3c/svg%3e) Your Privacy Choices
Your Privacy Choices